
Taking E-Business Suite R12.2.9 to the Cloud
The time to look at migrating your E-Business Suite installation to the cloud is now. EBS 12.1 will be out of support by the end of 2021 and ... Read More
Learn more about why Eclipsys has been certified as a Great Place to Work in Canada, Best Workplaces in Ontario and Technology, and named Canada’s Top SME Employer for 3 years!
Learn more!For a long time, Applications DBAs have been asking Oracle for an EBS appliance to use for testing purposes. Oracle EBS files installation media is available for download with size approaching half a terabyte. Common challenges faced when preparing a test environment were the download connection speed and reliability, and the not inconsequential disk, CPU and memory requirements.
The introduction of Oracle VirtualBox and Oracle VM Server ushered in a new era of learning and discovery through virtualization enabling testing sandboxes to keep you one step ahead. EBS Installation procedures are disparate and while building a test system takes time, the learning curve can be steep. While this will surely help you assimilate skills required when facing production installations, a working appliance is a quick way to get some experience with new application functionalities.
Oracle Corporation recently released the following EBS R12 virtual appliances:
Oracle VM Virtual Appliance for Oracle E-Business Suite Deployment Guide, Release 12.2.8 (Doc ID 2462176.1)
These appliances are available and ready for download.
Technically speaking, the same install procedure implies to all.
In this blog, we’ll be focusing on R12.2.6 as a way to test the upgrade to higher releases. Oracle provides full upgrade documentation and it will be an excellent exercise for all learning communities.
The differences will be in the downloaded file names and sizes. After import, we’ll have EBS R12 based on appliance release.
Let’s start by creating the virtualized environment
Download and install VBox
There are possibilities of different versions based on your Operating System.
On the Oracle Software Delivery Cloud page: https://edelivery.oracle.com
– Search by Select “Release” from the drop-down list.
(see picture below)
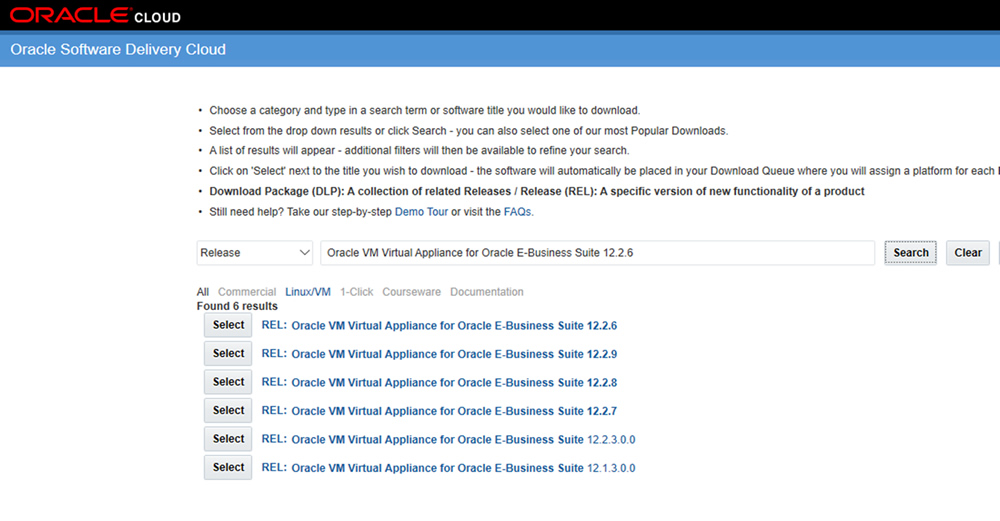
Click on Select; a message will pop-up saying “added to download”.
Click the Continue button: Choose the platform “x86 64 bit”
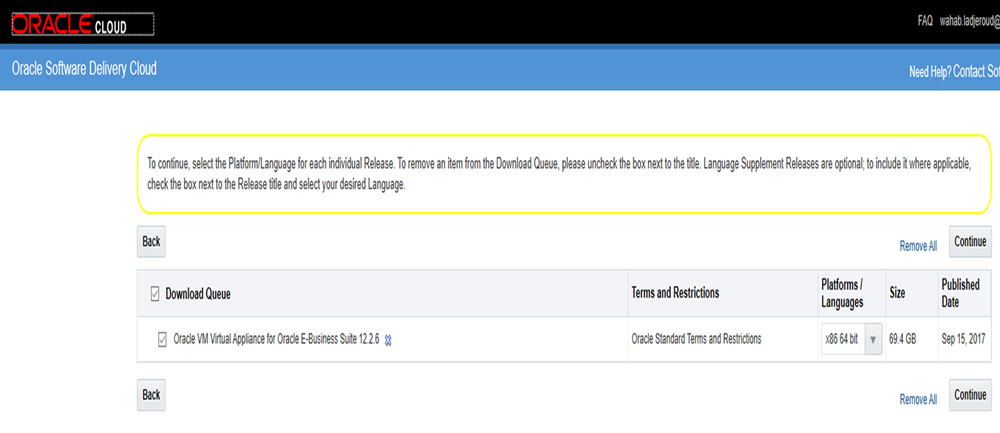
Click the Continue button again and accept the Oracle Standard Terms and Restrictions.
The File Download window appears with your selected “Oracle VM Virtual Appliance for Oracle E-Business Suite (12.2.6) for x86 64 bit”, Listing all the needed files
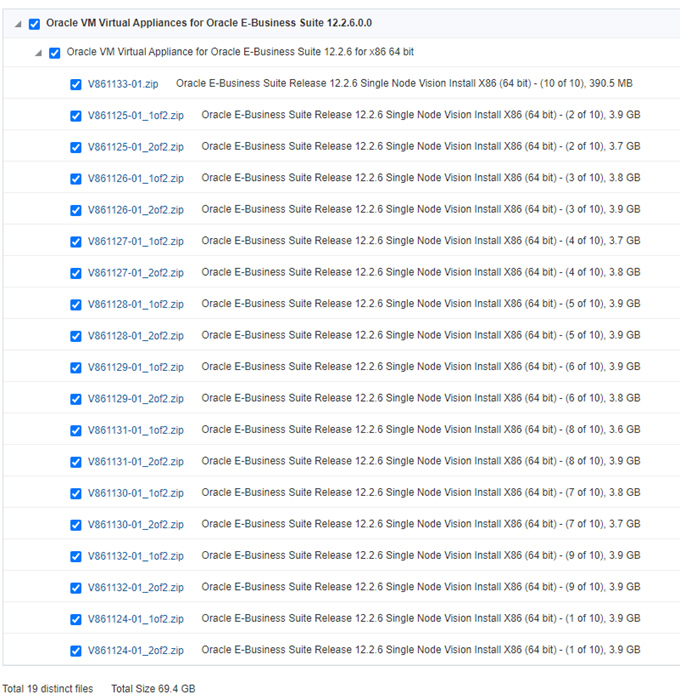

The Oracle VM Virtual Appliances for Oracle E-Business Suite 12.2.6 for x86 64bit is packaged in 19 files requiring 69.4 GB,
They are all in zipped format. Expect some time to get it downloaded depending upon your network/internet connection.
Below are the versions of the components of the Appliance that will be downloaded.

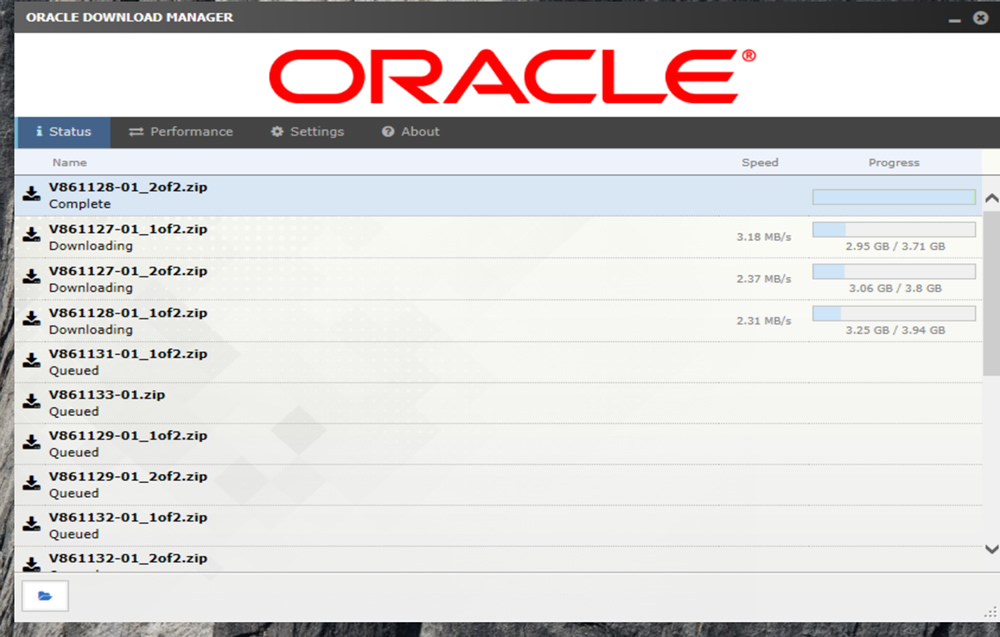
Click the windows install manager and the download start. It may take a while before you get it done.
Go for coffee (a few hours) or even more based on your Processor/Memory.
After the download is finished. Files will need to be unzipped in the staging area
Download 7-zip software from https://www.7-zip.org/download.html
Select the 64bit version
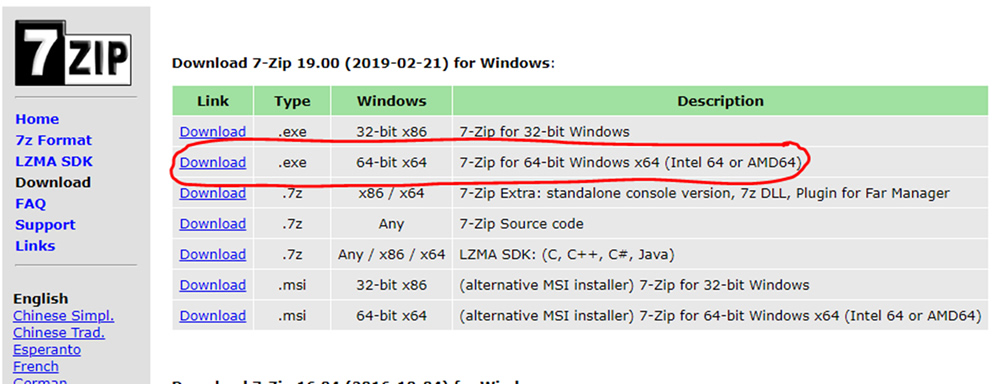
7-zip will overcome the WinZip file size limitation that leads to some corrupted files and a waste of time WinZip-ing.
You will need another additional +-70 Gbytes of space (depending on the appliance version)
No worry after the reconstruction of the appliance, all the zipped and the unzipped files can be removed and you will regain your free space.
If you keep the zip files, the unzipped OVA parts and the constructed files it’s a total close to 200 gigabytes
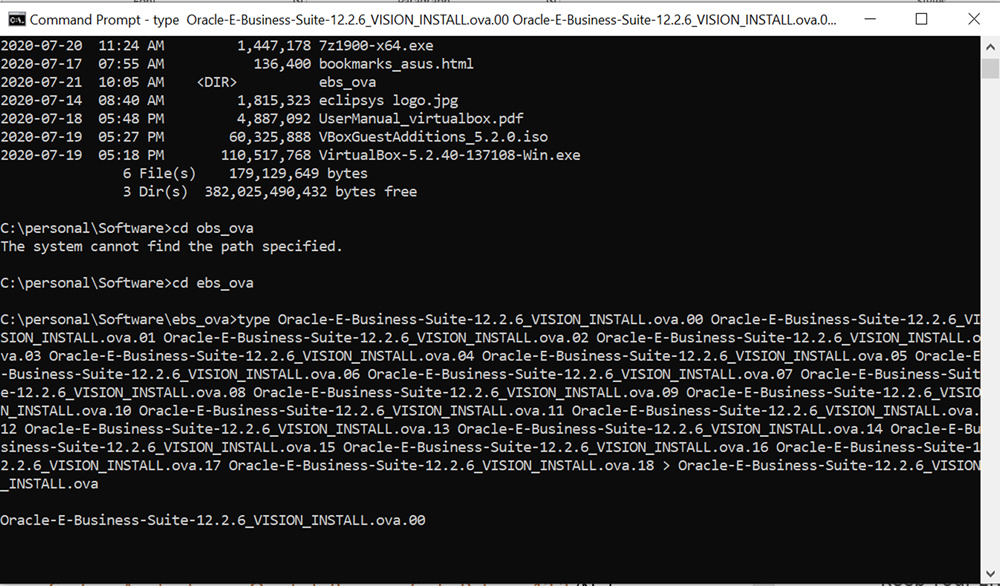
Open a command prompt and copy and paste the expression below:
Preferably, paste it in a text editor like Notepad to remove any hidden characters; recopy the expression from it and paste it to the command prompt.
type Oracle-E-Business-Suite-12.2.6_VISION_INSTALL.ova.00 Oracle-E-Business-Suite-12.2.6_VISION_INSTALL.ova.01 Oracle-E-Business-Suite-12.2.6_VISION_INSTALL.ova.02 Oracle-E-Business-Suite-12.2.6_VISION_INSTALL.ova.03 Oracle-E-Business-Suite-12.2.6_VISION_INSTALL.ova.04 Oracle-E-Business-Suite-12.2.6_VISION_INSTALL.ova.05 Oracle-E-Business-Suite-12.2.6_VISION_INSTALL.ova.06 Oracle-E-Business-Suite-12.2.6_VISION_INSTALL.ova.07 Oracle-E-Business-Suite-12.2.6_VISION_INSTALL.ova.08 Oracle-E-Business-Suite-12.2.6_VISION_INSTALL.ova.09 Oracle-E-Business-Suite-12.2.6_VISION_INSTALL.ova.10 Oracle-E-Business-Suite-12.2.6_VISION_INSTALL.ova.11 Oracle-E-Business-Suite-12.2.6_VISION_INSTALL.ova.12 Oracle-E-Business-Suite-12.2.6_VISION_INSTALL.ova.13 Oracle-E-Business-Suite-12.2.6_VISION_INSTALL.ova.14 Oracle-E-Business-Suite-12.2.6_VISION_INSTALL.ova.15 Oracle-E-Business-Suite-12.2.6_VISION_INSTALL.ova.16 Oracle-E-Business-Suite-12.2.6_VISION_INSTALL.ova.17 Oracle-E-Business-Suite-12.2.6_VISION_INSTALL.ova.18 > Oracle-E-Business-Suite-12.2.6_VISION_INSTALL.ova
It will start processing the merge after hitting enter:
Note: For R12.2.7, R12.2.8 and R12.2.9 we have a different set of files and different filenames.
The import scripts are ready for use below for the R12.2.7, R12.2.8 and R12.2.9 versions, you just need to download and unzip the files.
type  Oracle-E-Business-Suite-12.2.7_VISION_INSTALL.ova.00 Oracle-E-Business-Suite-12.2.7_VISION_INSTALL.ova.01 Oracle-E-Business-Suite-12.2.7_VISION_INSTALL.ova.02 Oracle-E-Business-Suite-12.2.7_VISION_INSTALL.ova.03 Oracle-E-Business-Suite-12.2.7_VISION_INSTALL.ova.04 Oracle-E-Business-Suite-12.2.7_VISION_INSTALL.ova.05 Oracle-E-Business-Suite-12.2.7_VISION_INSTALL.ova.06 Oracle-E-Business-Suite-12.2.7_VISION_INSTALL.ova.07 Oracle-E-Business-Suite-12.2.7_VISION_INSTALL.ova.08 Oracle-E-Business-Suite-12.2.7_VISION_INSTALL.ova.09 Oracle-E-Business-Suite-12.2.7_VISION_INSTALL.ova.10 Oracle-E-Business-Suite-12.2.7_VISION_INSTALL.ova.11 Oracle-E-Business-Suite-12.2.7_VISION_INSTALL.ova.12 Oracle-E-Business-Suite-12.2.7_VISION_INSTALL.ova.13 Oracle-E-Business-Suite-12.2.7_VISION_INSTALL.ova.14 Oracle-E-Business-Suite-12.2.7_VISION_INSTALL.ova.15 Oracle-E-Business-Suite-12.2.7_VISION_INSTALL.ova.16 Oracle-E-Business-Suite-12.2.7_VISION_INSTALL.ova.17 > Oracle-E-Business-Suite-12.2.7_VISION_INSTALL.ova

type Oracle-E-Business-Suite-12.2.8_VISION_INSTALL.ova.00 Oracle-E-Business-Suite-12.2.8_VISION_INSTALL.ova.01 Oracle-E-Business-Suite-12.2.8_VISION_INSTALL.ova.02 Oracle-E-Business-Suite-12.2.8_VISION_INSTALL.ova.03 Oracle-E-Business-Suite-12.2.8_VISION_INSTALL.ova.04 Oracle-E-Business-Suite-12.2.8_VISION_INSTALL.ova.05 Oracle-E-Business-Suite-12.2.8_VISION_INSTALL.ova.06 Oracle-E-Business-Suite-12.2.8_VISION_INSTALL.ova.07 Oracle-E-Business-Suite-12.2.8_VISION_INSTALL.ova.08 Oracle-E-Business-Suite-12.2.8_VISION_INSTALL.ova.09 Oracle-E-Business-Suite-12.2.8_VISION_INSTALL.ova.10 Oracle-E-Business-Suite-12.2.8_VISION_INSTALL.ova.11 Oracle-E-Business-Suite-12.2.8_VISION_INSTALL.ova.12 Oracle-E-Business-Suite-12.2.8_VISION_INSTALL.ova.13 Oracle-E-Business-Suite-12.2.8_VISION_INSTALL.ova.14 Oracle-E-Business-Suite-12.2.8_VISION_INSTALL.ova.15 Oracle-E-Business-Suite-12.2.8_VISION_INSTALL.ova.16 >  Oracle-E-Business-Suite-12.2.8_VISION_INSTALL.ova

type  Oracle-E-Business-Suite-12.2.9_VISION_INSTALL.ova.00 Oracle-E-Business-Suite-12.2.9_VISION_INSTALL.ova.01 Oracle-E-Business-Suite-12.2.9_VISION_INSTALL.ova.02 Oracle-E-Business-Suite-12.2.9_VISION_INSTALL.ova.03 Oracle-E-Business-Suite-12.2.9_VISION_INSTALL.ova.04 Oracle-E-Business-Suite-12.2.9_VISION_INSTALL.ova.05 Oracle-E-Business-Suite-12.2.9_VISION_INSTALL.ova.06 Oracle-E-Business-Suite-12.2.9_VISION_INSTALL.ova.07 Oracle-E-Business-Suite-12.2.9_VISION_INSTALL.ova.08 Oracle-E-Business-Suite-12.2.9_VISION_INSTALL.ova.09 Oracle-E-Business-Suite-12.2.9_VISION_INSTALL.ova.10 Oracle-E-Business-Suite-12.2.9_VISION_INSTALL.ova.11 Oracle-E-Business-Suite-12.2.9_VISION_INSTALL.ova.12 Oracle-E-Business-Suite-12.2.9_VISION_INSTALL.ova.13 Oracle-E-Business-Suite-12.2.9_VISION_INSTALL.ova.14 Oracle-E-Business-Suite-12.2.9_VISION_INSTALL.ova.15 Oracle-E-Business-Suite-12.2.9_VISION_INSTALL.ova.16 > Oracle-E-Business-Suite-12.2.9_VISION_INSTALL.ova
It takes at least 1 to 2 hours or even more based on your Processor/Memory to get the merged file.
And this is it: Oracle-E-Business-Suite-12.2.6_VISION_INSTALL.ova
Click on Expert mode and edit the ‘Virtual Disk Image’ path to a location with adequate space.
At this stage, you should have at least 300 gigabytes or the process aborts. You may need to delete the zip files to make room for the import.
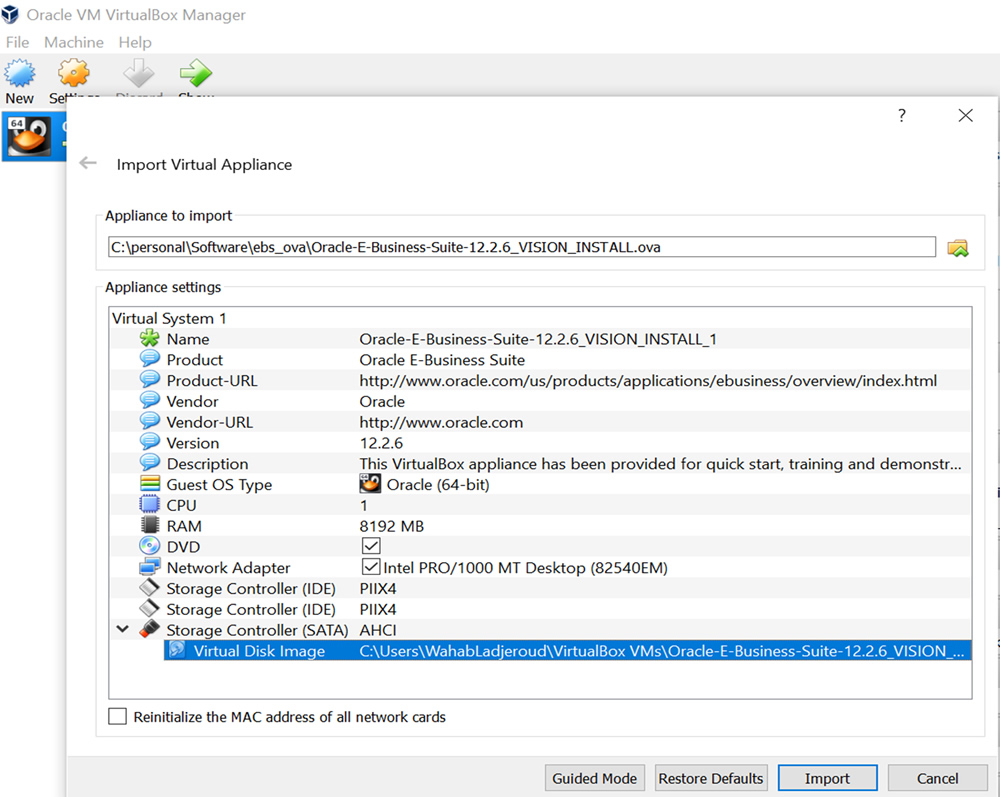
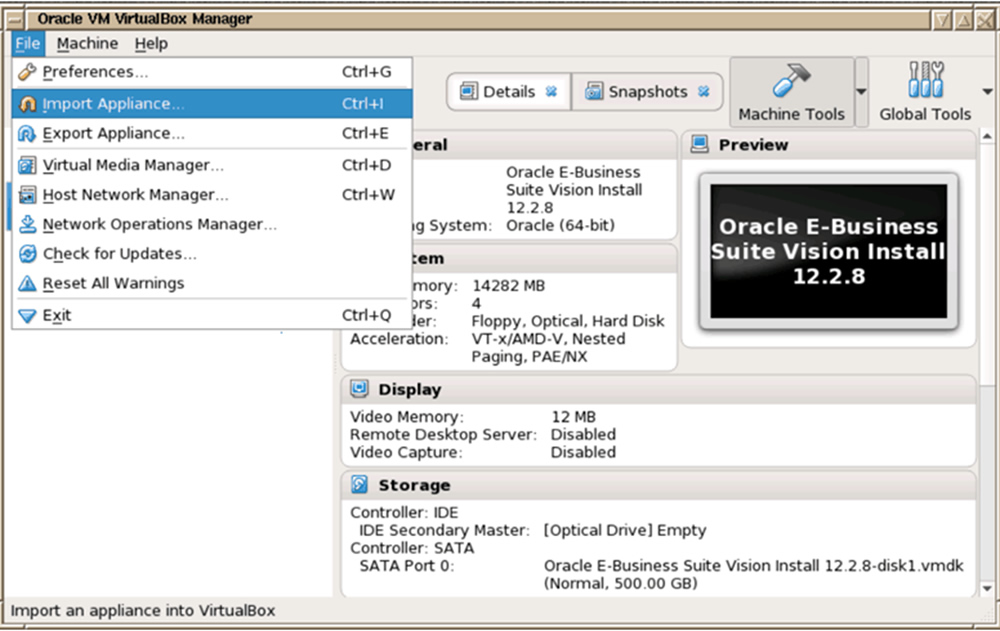
Click Import

After the import process completes successfully, the virtual machine is listed in the Oracle VM VirtualBox Manager.

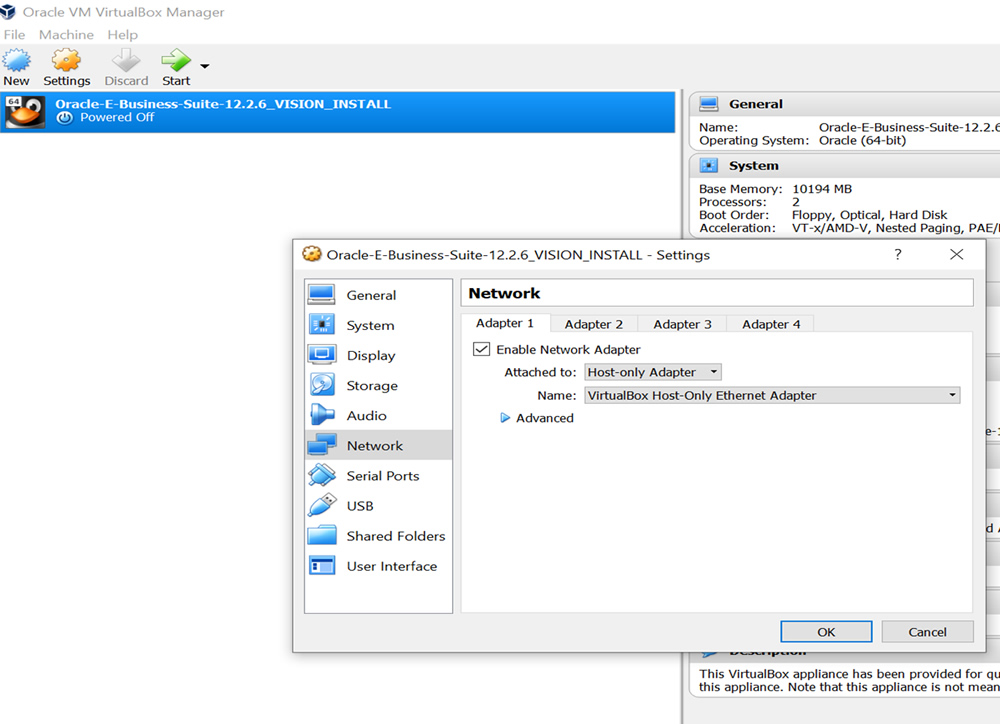
Some settings changes can be done by selecting the newly imported virtual machine and click Settings:
Adjust RAM memory, number of CPUs, etc.
For Networking, you can attach Adapter as:
Host-Only Adapter allows your browser and SHH client on your laptop to access the VM.
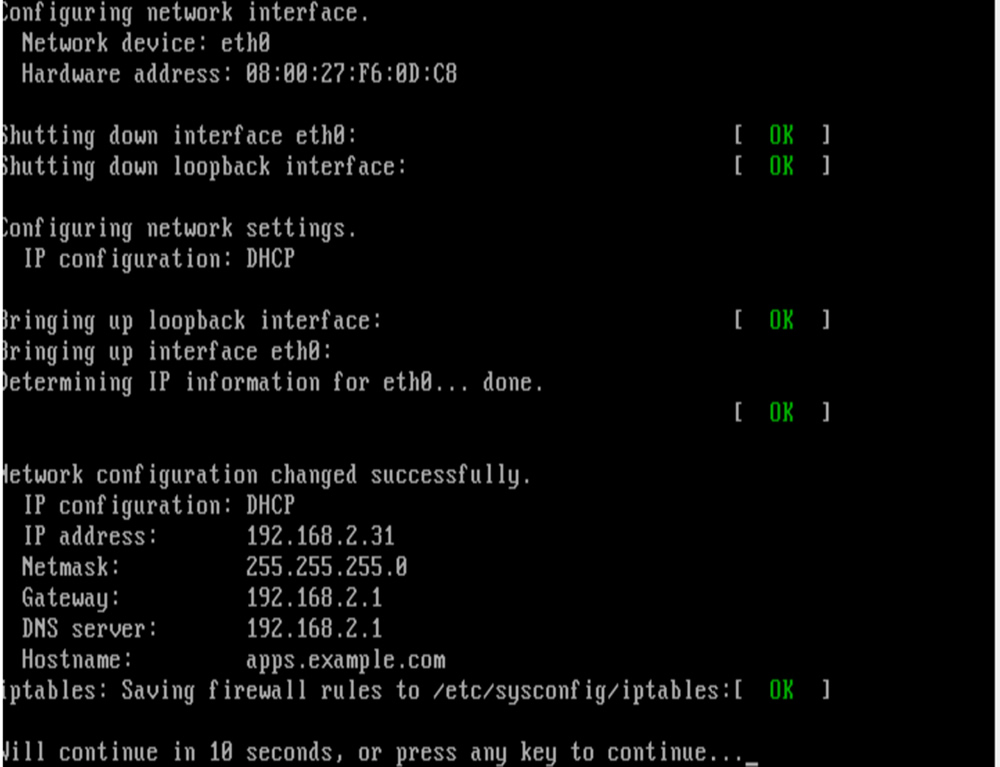
The VM starts by booting when a red progress bar shows up at the bottom of the screen. Press the ESC key to see the detailed boot progress. At the end of the boot process, the output will pause for about 10 seconds displaying the IP address and hostname information.
Shown in the picture below.
The information below related to the hostname will be available for 10 seconds.
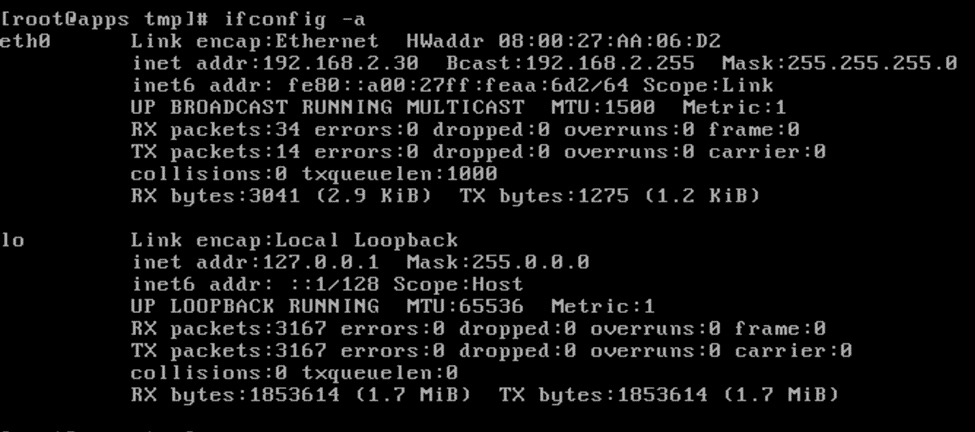
You can log in as root and get the IP address from the /etc/hosts file.
More processing:
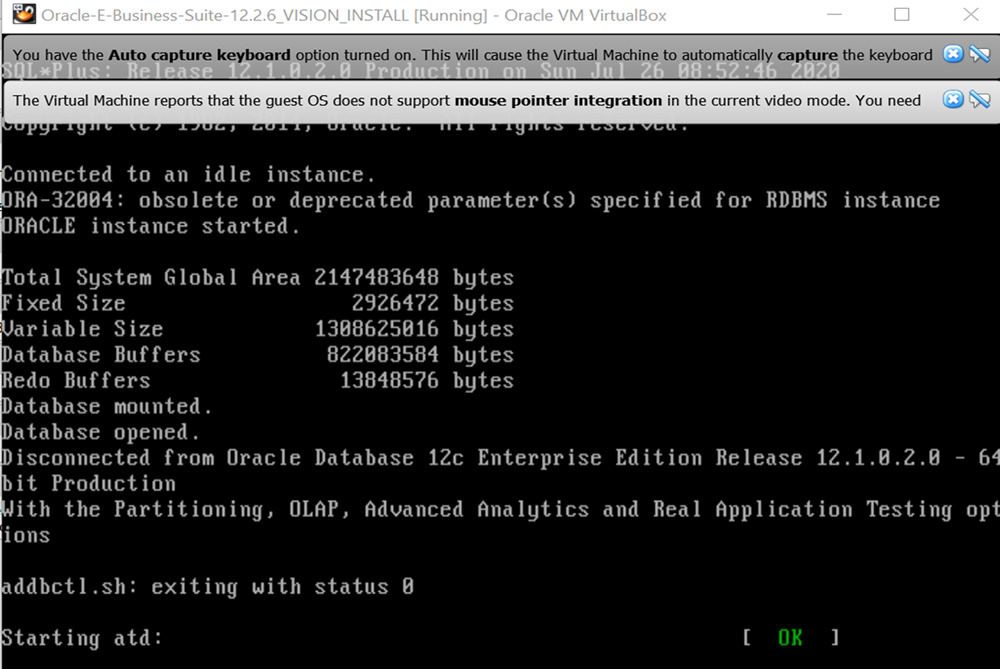
After that, you have the VM login prompt.
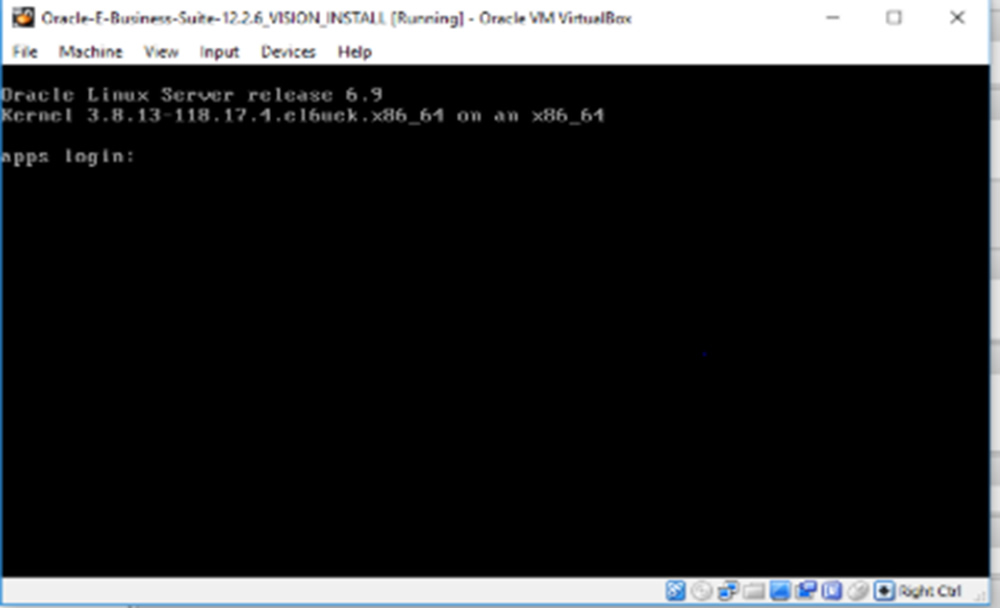
Login and when prompted, enter new passwords for:
root, oracle and applmgr
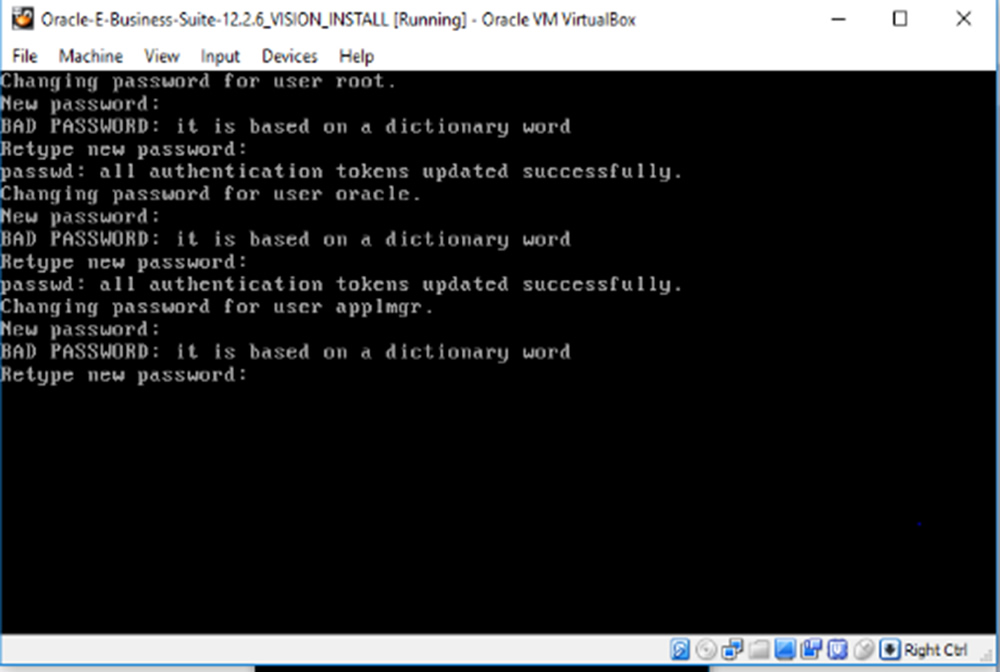
No user input is necessary during this post-install process steps.
Nothing to worry about.
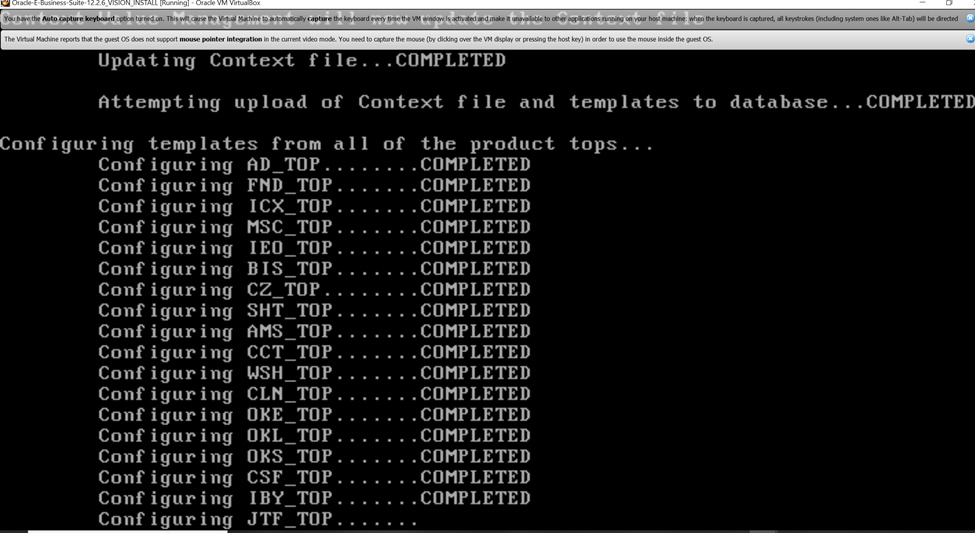
At a certain point during the post-install process you will be prompted to:
select whether to add start or stop of the database and application tier processes to the OS boot script.
Enter VISION to configure the Vision Demo instance.
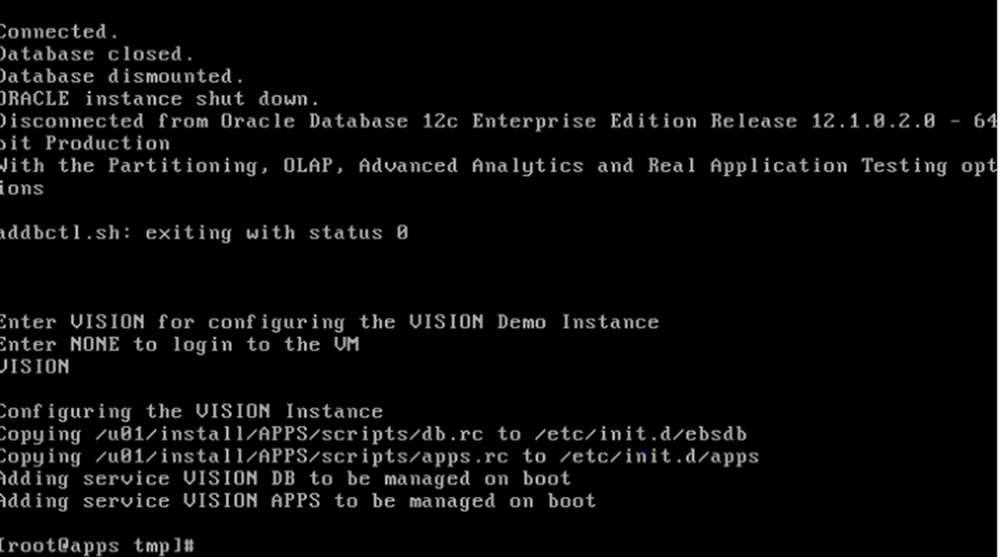
You are connected to the VM as root:
Issue: ifconfig -a
To access the EBS Application from your website you will have to make minor changes in the
Windows host file by:
(You may have to temporarily change permissions if you do have Administrator privileges)
<IP address> apps.example.com apps
Use an SSH client, like Putty to ssh to the file system and explore the operating system installation.
Use http://apps.example.com:8000 to access EBS Application
The default passwords are:
All these passwords could be changed but you can keep them as they are until you get used to the Apps.
But if you feel the need to change, connect to the VM through SSH as oracle:
Change directory to: /u01/install/APPS/scripts
You will find a script to change the password for Sysadmin and for the Demo users.
[oracle@apps scripts]$ ./enableSYSADMIN.sh
[oracle@apps scripts]$ ./enableDEMOusers.sh
Oracle E-Business Suite has a dual file system; one for running the application and the second one for patching.
To understand the structure of the files, it is very convenient to install the “tree” tool.
On Linux it’s straightforward. As root
Issue: yum install tree
After installing the use of trees will give an idea of how the directories are spread.
tree -a
tree -d
tree -L 2
In many cases, when people encounter challenges when trying to set up the networking between the host and the guest VM, they turn to the GUI to run everything from inside the VM.
Not the best setup but at least spare sometime figuring out the connectivity problem. Linux offers a way of installing it.
How to Install GUI with Oracle Linux 7 (Doc ID 2153562.1)
Here are some additional materials to get you on your way:
Oracle VM Virtual Appliance for Oracle E-Business Suite Deployment Guide, Release 12.2.9 (Doc ID 2580936.1)
Oracle VM Virtual Appliance for Oracle E-Business Suite Deployment Guide, Release 12.2.8 (Doc ID 2462176.1)
Oracle VM Virtual Appliance for Oracle E-Business Suite Deployment Guide, Release 12.2.7 (Doc ID 2328923.1)
Oracle VM Virtual Appliance for Oracle E-Business Suite Deployment Guide, Release 12.2.6 (Doc ID 2254565.1)
The time to look at migrating your E-Business Suite installation to the cloud is now. EBS 12.1 will be out of support by the end of 2021 and ... Read More