Configure Nagios to Monitor Remote Windows Host
To configure Nagios to monitor a remote Windows host, you’ll need to set up NSClient++ on the Windows Machine. Install Nagios on the ... Read More
Learn more about why Eclipsys has been certified as a Great Place to Work in Canada, Best Workplaces in Ontario and Technology, and named Canada’s Top SME Employer for 3 years!
Learn more!Nagios Core is an open-source monitoring system that helps organizations identify and resolve IT infrastructure problems. It is designed to monitor hosts, services, and network devices, providing administrators with insights into the health and performance of their systems. Nagios Core is widely used for its flexibility, extensibility, and scalability.
Doing the following steps we can install Nagios Core on OL8.5
[root@emcl ~]# sestatus
SELinux status:                 enforcing

# disable selinux
[root@emcl ~]# vi /etc/selinux/config
# This file controls the state of SELinux on the system.
# SELINUX= can take one of these three values:
#     enforcing - SELinux security policy is enforced.
#     permissive - SELinux prints warnings instead of enforcing.
#     disabled - No SELinux policy is loaded.
SELINUX=disabled
# SELINUXTYPE= can take one of these three values:
#     targeted - Targeted processes are protected,
#     minimum - Modification of targeted policy. Only selected processes are protected.
#     mls - Multi Level Security protection.
SELINUXTYPE=targeted
2_1. First I checked that the dnf is installed on the OL8.5 by default
[root@emcl ~]# rpm -qa | grep  dnf
python3-dnf-plugins-core-4.0.21-3.0.1.el8.noarch
dnf-plugin-spacewalk-2.8.5-11.0.3.module+el8.3.0+20070+f5719e00.noarch
python3-libdnf-0.63.0-3.0.1.el8.x86_64
dnf-4.7.0-4.0.1.el8.noarch
dnf-plugins-core-4.0.21-3.0.1.el8.noarch
python3-dnf-plugin-spacewalk-2.8.5-11.0.3.module+el8.3.0+20070+f5719e00.noarch
libdnf-0.63.0-3.0.1.el8.x86_64
python3-dnf-4.7.0-4.0.1.el8.noarch
python3-dnf-plugin-ulninfo-0.3-2.module+el8.4.0+20142+f119a2fa.noarch
dnf-data-4.7.0-4.0.1.el8.noarch
2_2. To install Nagios Core on a Linux system, you must ensure that certain packages and dependencies are installed. The specific packages required may vary slightly depending on your Linux distribution. Here for OL8.5, we need to install the following packages, and then enable and start httpd service.
[root@emcl ~]# dnf install -y gcc glibc glibc-common perl httpd php wget gd gd-devel
[root@emcl ~]# systemctl start httpd
[root@emcl ~]# systemctl enable httpd
Created symlink /etc/systemd/system/multi-user.target.wants/httpd.service → /usr/lib/systemd/system/httpd.service.
[root@emcl ~]# systemctl start httpd
To download and install Nagios Core, follow these general steps. Please note that the version numbers and specific commands may vary based on the latest releases. Always refer to the official Nagios website (https://www.nagios.org/) for the most up-to-date information.
3_1. Download Nagios Core:
# Navigate to a directory where you want to download Nagios Core
cd /software

# Download the Nagios Core source tarball
wget https://assets.nagios.com/downloads/nagioscore/releases/nagios-.tar.gz

# Replace  with the actual version number available on the Nagios website. for example
wget -O nagioscore.tar.gz https://github.com/NagiosEnterprises/nagioscore/archive/nagios-4.4.3.tar.gz
3_2. Compile and Install Nagios Core:
[root@emcl ~]# cd /software/
[root@emcl software]# tar xzf /software/nagioscore-nagios-4.4.3.tar.gz
[root@emcl software]# cd nagioscore-nagios-4.4.3/

# configure the source package and build it.
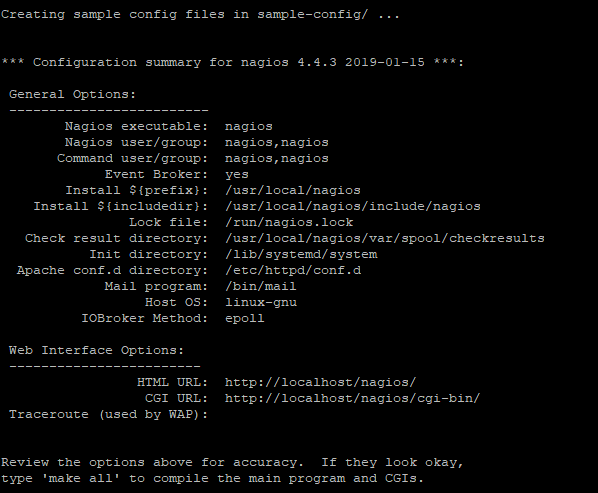
[root@emcl nagioscore-nagios-4.4.3]# ./configure

Compile and Install Nagios
[root@emcl nagioscore-nagios-4.4.3]# make all

# create the Nagios User and Group, and add the Apache user to the Nagios Group
[root@emcl nagioscore-nagios-4.4.3]# make install-groups-users
groupadd -r nagios
useradd -g nagios nagios
[root@emcl nagioscore-nagios-4.4.3]#  usermod -a -G nagios apache

# Install init scripts and set permissions
[root@emcl nagioscore-nagios-4.4.3]# make install
[root@emcl nagioscore-nagios-4.4.3]# make install-daemoninit
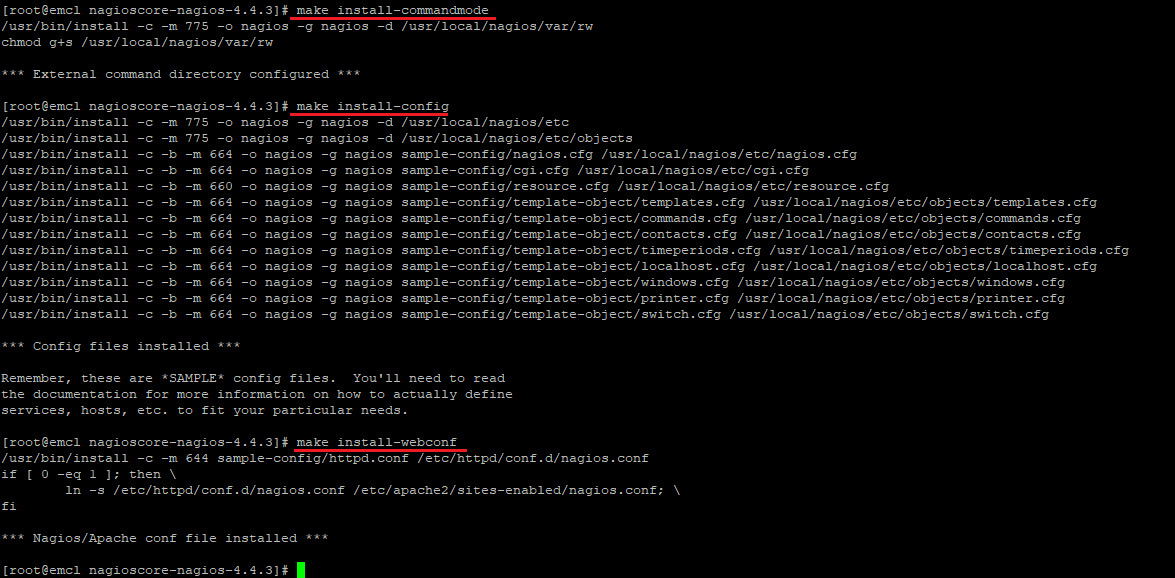
[root@emcl nagioscore-nagios-4.4.3]# make install-commandmode
[root@emcl nagioscore-nagios-4.4.3]# make install-config

# Install the Apache configuration file
[root@emcl nagioscore-nagios-4.4.3]# make install-webconf
Securing Nagios Core is crucial to ensure that your monitoring system is protected from unauthorized access and potential security threats. Here are some key steps to help secure Nagios Core:
4_1. Change the default login credentials for the Nagios web interface. You can do this by modifying the htpasswd.users file.
[root@emcl nagioscore-nagios-4.4.3]#  htpasswd -c /usr/local/nagios/etc/htpasswd.users nagiosadmin
New password:
Re-type new password:
Adding password for user nagiosadmin

To install Nagios Plugins on Oracle Enterprise Linux (OEL) 8.5, you can follow these general steps. Please note that the specific package names and commands might vary based on the exact OEL version and package availability. Adjust the commands as needed.
5_1. install the required packages for compiling and building the plugin package.
# dnf install -y gcc glibc glibc-common make gettext automake autoconf wget openssl-devel net-snmp net-snmp-utils
5_2. Download and Install Nagios Plugins:
# Navigate to a directory where you want to download Nagios Plugins
[root@emcl nagioscore-nagios-4.4.3]# cd /software/

# Download the Nagios Plugins source tarball
wget --no-check-certificate -O nagios-plugins.tar.gz https://github.com/nagios-plugins/nagios-plugins/archive/release-2.2.1.tar.gz

# Extract the tarball
[root@emcl software]#  tar zxf nagios-plugins-release-2.2.1.tar.gz
5_3. Compile and Install Nagios Plugins:
[root@emcl nagios-plugins-release-2.2.1]# cd nagios-plugins-release-2.2.1/
[root@emcl nagios-plugins-release-2.2.1]# ./tools/setup
[root@emcl nagios-plugins-release-2.2.1]# ./configure
[root@emcl nagios-plugins-release-2.2.1]# make
[root@emcl nagios-plugins-release-2.2.1]# make install
5_4. Verify Installation: You can verify that the Nagios Plugins are installed correctly by running a simple check, for example:
/usr/local/nagios/libexec/check_disk -w 20% -c 10%
5_5. Restart Nagios: After making changes to the configuration, restart the Nagios service:
[root@emcl nagios-plugins-release-2.2.1]# systemctl restart httpd.service
[root@emcl nagios-plugins-release-2.2.1]# systemctl start nagios.service
Failed to start nagios.service: Unit nagios.service not found.
If you are encountering the error “Failed to start nagios.service: Unit nagios.service not found,” it suggests that the Nagios service unit file is not present in the expected location or the service has not been properly installed or configured. Do the following to resolve this problem.
[root@emcl ~]#  vi /etc/systemd/system/nagios.service
[Unit]
Description=Nagios
BindTo=network.target


[Install]
WantedBy=multi-user.target

[Service]
User=nagios
Group=nagios
Type=simple
ExecStart=/usr/local/nagios/bin/nagios /usr/local/nagios/etc/nagios.cfg

# Check the status of the Nagios service to see if it is running without issues:
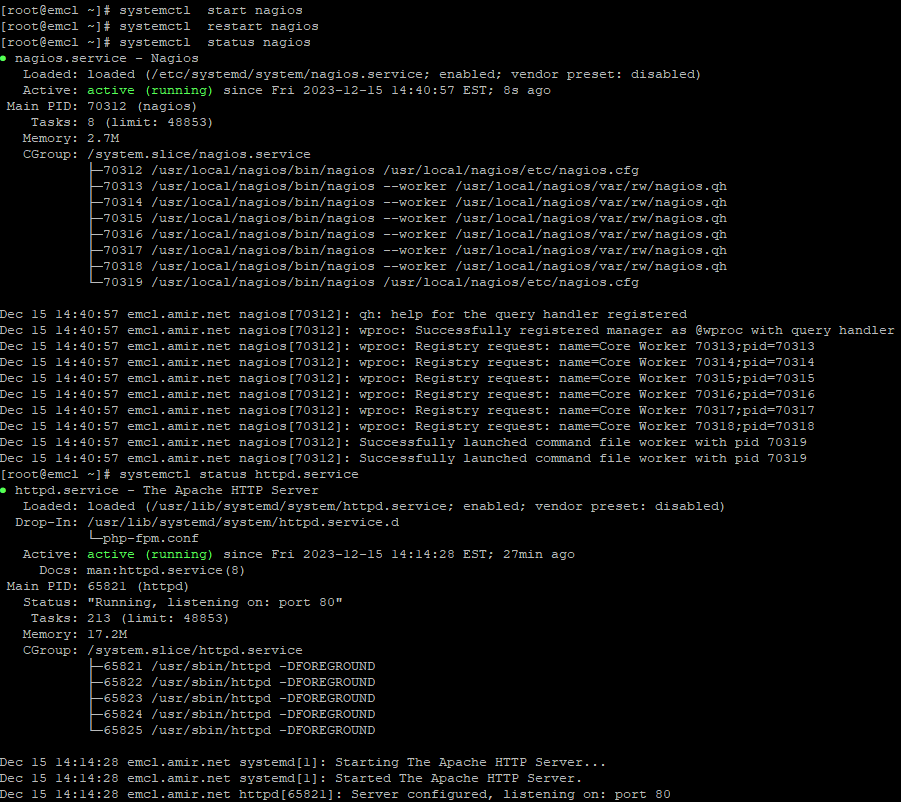
[root@emcl ~]# systemctl  start nagios
[root@emcl ~]# systemctl  restart nagios
[root@emcl ~]# systemctl  status nagios

To allow access to Nagios through the firewall, you’ll need to add a rule to allow traffic on the port that Nagios is using. By default, Nagios uses port 80 for HTTP and port 443 for HTTPS. Here’s how you can add a rule to allow traffic on port 80:
# Add a rule to allow traffic on port 80 (HTTP)
firewall-cmd --zone=public --add-port=80/tcp --permanent

# Reload the firewall to apply the changes
 firewall-cmd --reload
Make sure to adjust the port number based on your Nagios configuration. Note: The commands above assume that the “public” zone is appropriate for your network configuration. If you use a different zone, replace “public” with the appropriate zone name. If you are running Nagios on a different port, adjust the port number accordingly in the commands. After adding the firewall rule, external systems should be able to access Nagios through the specified port. Always consider security best practices and limit access to only the necessary ports.
To access the Nagios web console, you need to use a web browser and navigate to the URL where Nagios is hosted.
http://192.168.56.2/nagios
You should be prompted with the Nagios login screen. Enter the username and password to log in. The default credentials are often:
Username: nagiosadmin
Password: The password you set during the installation process.
If you have changed the login credentials, use the updated username and password.
NRPE (Nagios Remote Plugin Executor) is a Nagios agent that allows remote systems to be monitored using scripts and plugins. To install NRPE on the Nagios monitoring server, you’ll need to follow these steps:
cd /software

wget https://github.com/NagiosEnterprises/nrpe/releases/download/nrpe-4.0.2/nrpe-4.0.2.tar.gz
# Unpack the NRPE source code tarball.
[root@emcl software]# cd /software/
[root@emcl software]# tar xzf nrpe-4.0.2.tar.gz
[root@emcl software]# cd nrpe-4.0.2
# Compile and install the NRPE addon.
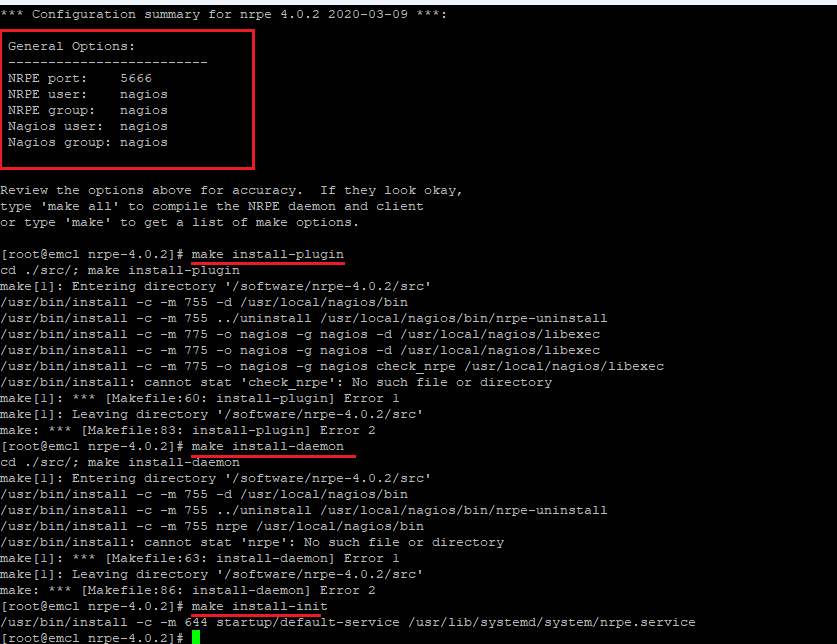
[root@emcl nrpe-4.0.2]# ./configure
[root@emcl nrpe-4.0.2]# make all
# install the NRPE plugin daemon, and sample config files.
[root@emcl nrpe-4.0.2]# make install-plugin
[root@emcl nrpe-4.0.2]# make install-daemon
[root@emcl nrpe-4.0.2]# make install-config

To configure Nagios to monitor a remote Windows host, you’ll need to set up NSClient++ on the Windows Machine. Install Nagios on the ... Read More
To monitor a remote Oracle Linux host using Nagios, we’ll need to install Nagios Plugins and NRPE (Nagios Remote Plugin Executor) on the remote ... Read More