Terraform Modules Simplified
Terraform is probably already the de-facto standard for cloud deployment. I use it on a daily basis deploying and destroying my tests and demo setups ... Read More
Learn more about why Eclipsys has been named the 2023 Best Workplaces in Technology and Ontario, Certified as a Great Place to Work in Canada and named Canada’s Top SME Employer!
Learn more!In the previous post, I put some of my thoughts on why you would use the Google Bare Metal Service (BMS) and my first impression about it. In this post, I want to talk about the first steps and how you can start to work with the Google Bare Metal Service (BMS).
To put your hands on BMS you need to contact your Google Cloud sales representative and order it. It means you need to know to some extent your requirements and prepare for that. The major preparation steps are described in the Google documentation and here I will try to go through some of them.
The first main step is to outline your architecture and identify the region for the BMS. The service is a regional extension and it means it is connected to your regional Google cloud infrastructure by high-speed low latency network interconnect. It makes sense to place it where most of your applications and users are going to be. For example, in my case, I’ve chosen the us-west2 (Los Angeles) and it was aligned with my main test app servers and provided the best response time. The 64 bytes ping from an app server in the same region was 0.991 ms on average.
The next step is to identify the shape of the machine. The shape is defined by the number of CPUs and available memory on the box. They are starting from 8 cores with 192 GB memory up to a gigantic 448 CPU 24TB memory machine. Keep in mind that it is not flexible and the increment is relatively steep. It doubles CPU and memory on almost every next available shape. For example, the “o2-standard-48-metal” with 24 CPUs is followed by the “o2-standard-112-metal” with 56 CPU cores.
After choosing the shape you need to pick up the OS, and it can be either Linux in different flavours like Oracle Enterprise Linux (my choice), RHEL SLES, or Windows (coming soon). In some cases, it makes sense to use a Hypervisor if the box is too big and you need to allocate CPU in a more granular fashion to keep your license obligations. So far only Oracle Virtual Machine (OVM) is available but I expect the KVM will be available soon too. OVM is an approved partitioning technology for Oracle licensing.
The storage comes as a Fibre Channel SAN and has two options – either all-flash or a standard disk-based (HDD). The storage will be allocated in 1TB increments. I used 1Tb (split by two 500Gb) and 2Tb flash storage for my tests. It showed good performance providing up to 29.5k IOPS for random 4k block reads. I will provide more details in the following posts.
After picking up the box you need to plan your network. As I said the BMS is connected to your Google Cloud by the interconnect. It means it has to be in a dedicated address space not used by any of your existing networks and requires a basic understanding of network addressing, routing and firewalls. You can use your default network assigned to the project in the chosen region but I would recommend creating a VPC and plan your address space according to your needs. If, for example, you’ve decided to use your default network in the “us-west2” region with address 10.168.0.0/20 then you can either pick up any unused network space (including 192.168..) or go to 10.168.16.0/26. The main requirement is that the address space should not conflict with any existing networks in your VPCs. I personally don’t recommend using the continuation of the address space like 10.168.16.0/26 based on my experience. I would advise creating a new VPC with global dynamic routing and totally separated address space for BMS. Keep the routing table small and simple.
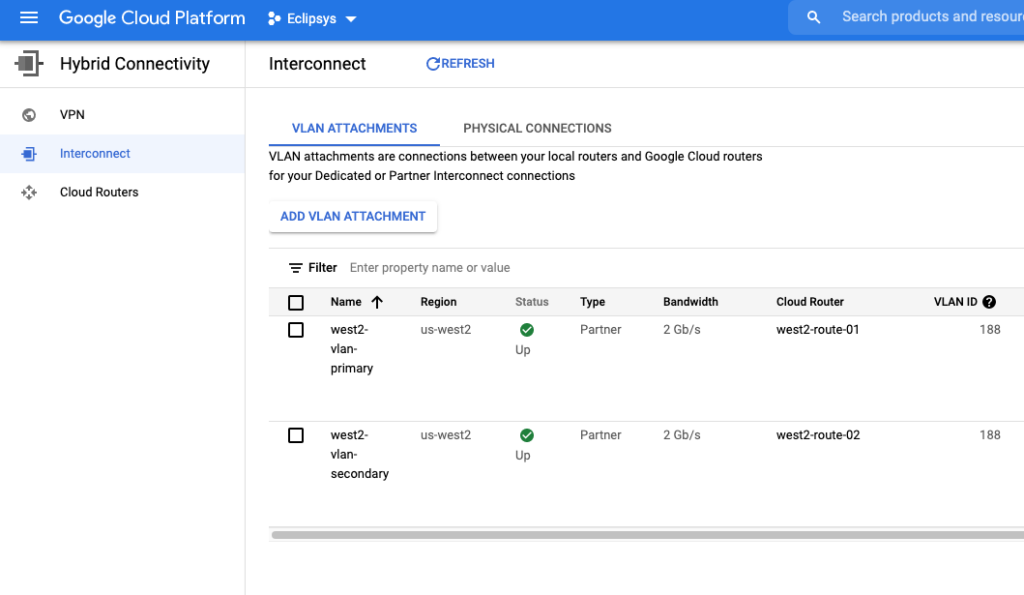
To connect the BMS network to VPC you create a couple of VLAN attachments using the Google manual and provide the pairing keys along with the region, shape, OS, storage and network parameters to the Google BMS team. Your VLAN attachment will be in the “Waiting for service provider” state.

After all those preparation steps are completed, the Google BMS team works preparing the box. Then they send you an email with the IP address for the BMS box and the initial password for the user “customeradmin” which has all sudo privileges. You also can have a look at your interconnect and make sure the VLAN attachments are up and ready.
On the VPC/routing page in your GCP console, you will also find 4 new dynamic routes for your VPC.

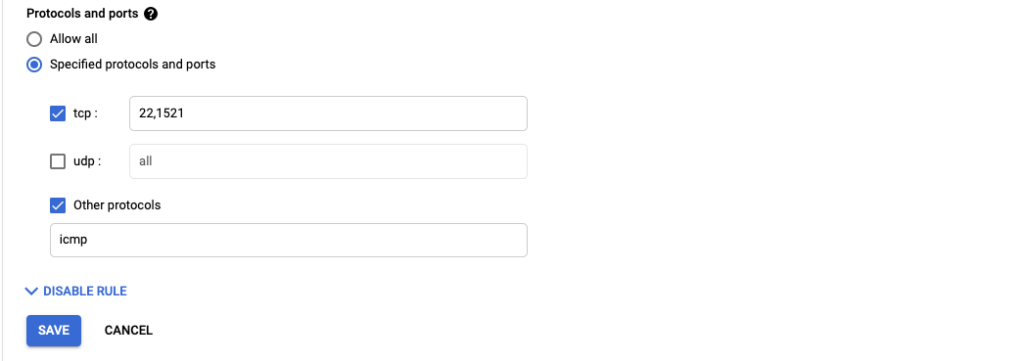
At that stage, your brand new BMC box is connected to your VPC. Now you need to create a bastion host in the VPC and set up firewall rules allowing SSH traffic between VPC and BMS. I set up rules for ICMP, SSH and TNS (port 1521) for my tests.
Everything is ready and you can connect to your BMS by SSH, change the password, verify storage, CPU, network and OS.
After all the listed steps were completed I created a NAT gateway box in my VPC. It allowed me to update packages on the BMS box and install some additional utilities for testing. The step-by-step procedure for the NAT gateway is described in the GCP documentation .
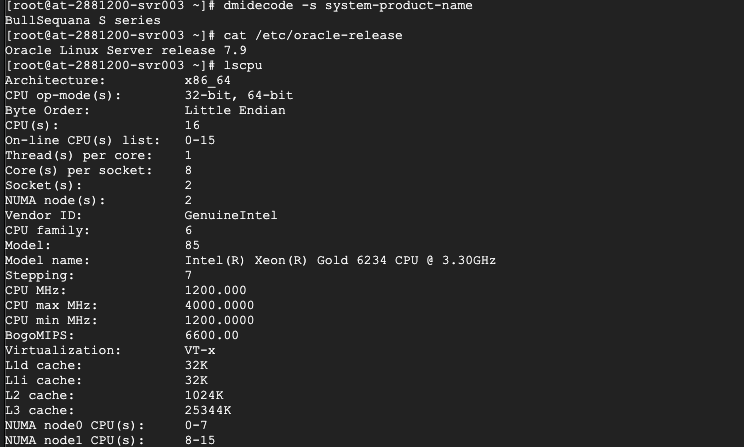
As for hardware, it is going to be HPE or Atos Bare-Metal Machines. In my case, I got a BullSequana S series Atos computer with 16 CPUs and 394 Gb memory running Oracle Linux 7.9.
Here is a short summary of what you need to do to get the BMS.
| No. | Action | Notes |
|---|---|---|
| 1 | Choose region | You can see a list of available regions for BMS in the documentation. https://cloud.google.com/bare-metal/docs/bms-planning |
| 2 | Choose shape | Shapes are listed here. https://cloud.google.com/bare-metal/docs/bms-planning |
| 3 | Storage | Define storage allocation. https://cloud.google.com/bare-metal/docs/bms-planning |
| 4 | Operation system | Available OS: https://cloud.google.com/bare-metal/docs/bms-planning |
| 5 | Network design | Design network architecture for your future environment. |
| 6 | Create the VLAN Attachments for the Cloud Interconnect and set up firewall rules. | A short instruction on how to do that. https://cloud.google.com/bare-metal/docs/bms-setup |
| 7 | Meet with your Google sales representative and fill out the order. | I don’t have a procedure for that or a description. I discussed all the parameters using Google meet. |
| 8 | Setup bastion host in the same region where BMS instance and (optionally) a NAT gateway host for BMS | You can read the step-by-step instruction here. https://cloud.google.com/bare-metal/docs/bms-setup#bms-access-internet-vm-nat |
A quick summary about the BMS server I am using.
| Name | Value |
|---|---|
| Type | o2-standard-32-metal |
| CPU cores | 16 |
| Memory | 384G |
| Network | 2Gbps |
| Local storage | 1 Tb |
| Attached storage | 2 Tb |
| Type of attached storage | Flash |
In the next posts, I will continue with the Storage, CPU and network performance tests. Stay tuned.
Terraform is probably already the de-facto standard for cloud deployment. I use it on a daily basis deploying and destroying my tests and demo setups ... Read More
If you’ve been following the recent changes in the Linux world you probably remember how Red Hat and Centos announced in December 2020 that the ... Read More