DATA GUARD CONFIGURATION ON ORACLE DATABASE APPLIANCE X3-2 USING DATAGUARD BROKER
Setting up Data Guard is a regular practice for DBAs to ensure their environments are able to withstand a disaster. Data Guard is a standard feature with Oracle Enterprise Edition. This blog lays out all of the steps necessary to configure Data Guard between two Oracle Database Appliances plus test the configuration with a switchover.
This is a Data Guard set up on an ODA X3-2 Bare Metal configuration using ASM storage. Two ODAs are used for this configuration. ODALIVE and ODADEV, both X3-2.
The primary database “ottawa” is located on “ODALIVE0” (which is the primary node “Node 1” of the ODALIVE ODA) and the physical standby will eventually be named “toronto” and will be located on “ODADEV0” (which is the primary node “Node 1” of the ODADEV ODA)
ODALIVE nodes -> ODALIVE0 & ODALIVE1
ODADEV nodes -> ODADEV0 & ODADEV1
Primary “ottawa” DB Configuration
- Confirm whether archivelog mode is enabled on “ottawa” on DB ODALIVE0.
Verify that the ottawa primary database is running in ARCHIVELOG mode.
Log into sqlplus and run the following
$ sqlplus / as sysdba
SQL> archive log list
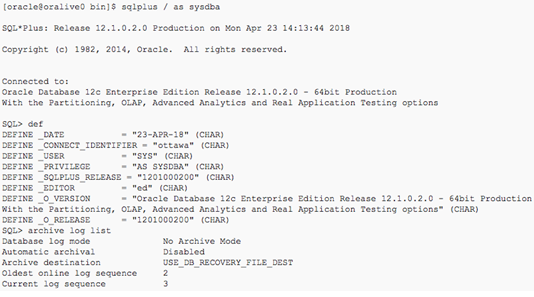
In this case the “ottawa” database is in noarchivelog mode, so we need to do the following to switch to archivelog mode.
SQL> shutdown immediate
SQL> startup mount
SQL> alter database archivelog;
SQL> alter database open;
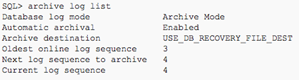
SQL> archive log list
2. Enabling FORCE LOGGING mode.
Force logging ensures integrity of your standby database. Verify if FORCE LOGGING is already enabled on your primary database.
SQL> select force_logging from v$database;
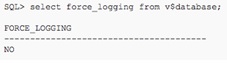
If force logging is disabled as in the above it has to be enabled for the dataguard process as follows.
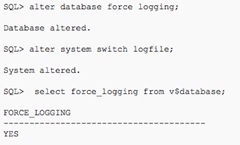
SQL> alter database force logging;

SQL> alter system switch logfile;

SQL> select force_logging from v$database;
3. Check whether FLASHBACK is enabled
Configuring the flashback database feature on the primary database removes the need for recreating the database after a failover operation. It can simply be flashed back to a point in time just prior to the failover.
SQL> select FLASHBACK_ON from v$database;
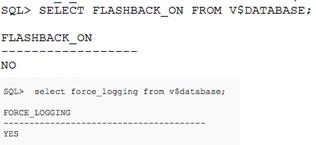
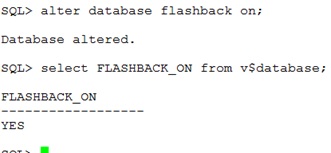
Here, it is disabled so it has to be enabled as follows.
SQL> alter database flashback on;

SQL> select FLASHBACK_ON from v$database;
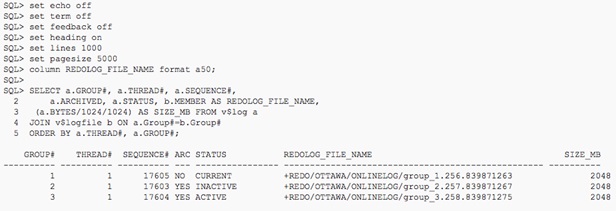
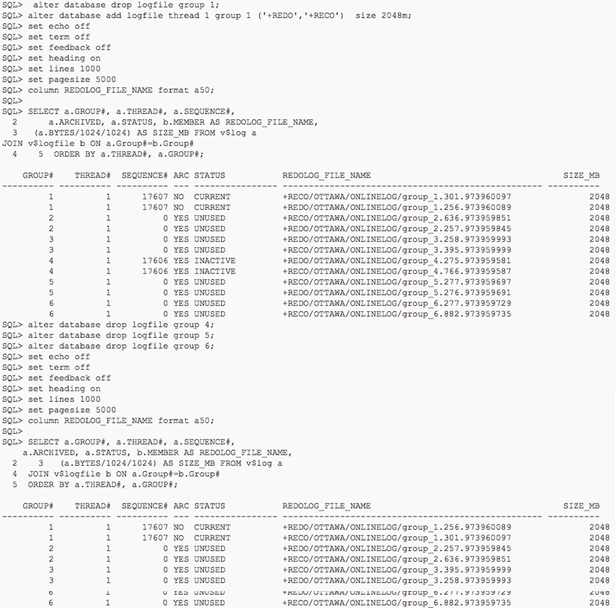
4. Confirm Redo File Location and Sizes
set echo off

set term off

set feedback off

set heading on

set lines 1000

set pagesize 5000

column REDOLOG_FILE_NAME format a50;
SELECT a.GROUP#, a.THREAD#, a.SEQUENCE#,

    a.ARCHIVED, a.STATUS, b.MEMBER AS REDOLOG_FILE_NAME,

 (a.BYTES/1024/1024) AS SIZE_MB FROM v$log a

JOIN v$logfile b ON a.Group#=b.Group#

ORDER BY a.THREAD#, a.GROUP#;
5. Consider multiplexing redo log files.
We can take the opportunity to multiplex our redo log files. To keep the group arrangement orderly in this scenario, we need to create additional log groups, drop the existing ones and then ensure your desired number of groups remain.
In this case, we would like to have one member per log group spread across +REDO & +RECO disk groups. Our intention in this case is to keep 3 online redo log groups.
SQL> alter database add logfile thread 1 group 1 ('+REDO','+RECO')  size   2048m;

SQL> alter database add logfile thread 1 group 2 ('+REDO','+RECO')  size   2048m;

SQL> alter database add logfile thread 1 group 3 ('+REDO','+RECO')  size   2048m;
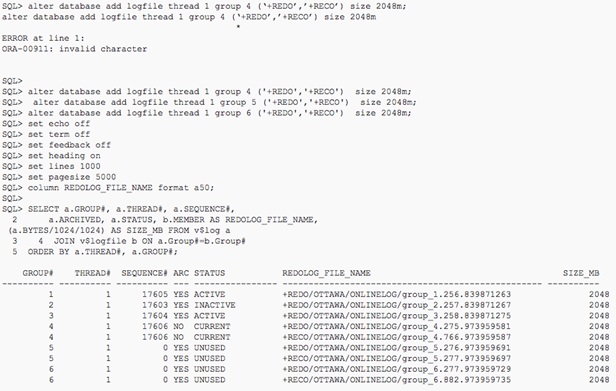
Now it is time to drop the non-multiplexed redo log files and replace with multiplexed redo logfiles.
Before we do so, we need to check whether the log group we want to drop has the attributes of “ARC=YES” and “STATUS=INACTIVE” or “STATUS=UNUSED”.
SQL> alter database drop logfile group 1;

SQL> alter database add logfile thread 1 group 1 ('+REDO','+RECO')  size 2048m;

SQL> alter database drop logfile group 2;

SQL> alter database add logfile thread 1 group 2 ('+REDO','+RECO')  size   2048m;

SQL> alter database drop logfile group 3;

SQL> alter database add logfile thread 1 group 3 ('+REDO','+RECO')  size   2048m;

In case we experience an error resembling the following –

We need to run the sql below to force a log switch and change the log status as indicated previously.
SQL> alter system switch all logfile;
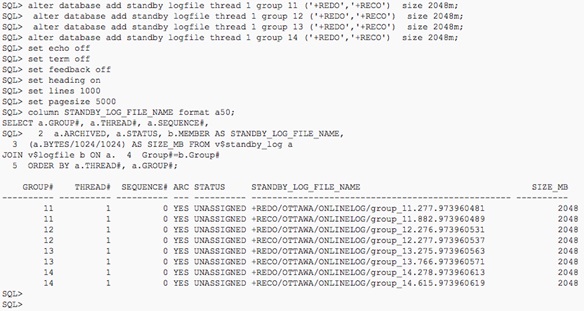
6. Create Standby Log Files on OTTAWA Primary.
The standby redo log groups must contain one group more than exists for the online redo logs. You can confirm standby log creation with the below SQL.
set echo off

set term off

set feedback off

set heading on

set lines 1000

set pagesize 5000

column STANDBY_LOG_FILE_NAME format a50;

SELECT a.GROUP#, a.THREAD#, a.SEQUENCE#,

a.ARCHIVED, a.STATUS, b.MEMBER AS STANDBY_LOG_FILE_NAME,

(a.BYTES/1024/1024) AS SIZE_MB FROM v$standby_log a

JOIN v$logfile b ON a.Group#=b.Group#

ORDER BY a.THREAD#, a.GROUP#;


SQL> alter database add standby logfile thread 1 group 11 ('+REDO','+RECO')  size 2048m;
SQL> alter database add standby logfile thread 1 group 12 ('+REDO','+RECO')  size 2048m;
SQL> alter database add standby logfile thread 1 group 13 ('+REDO','+RECO')  size 2048m;
SQL> alter database add standby logfile thread 1 group 14 ('+REDO','+RECO')  size 2048m;
SQL> alter database add standby logfile thread 1 group 15 ('+REDO','+RECO')  size 2048m;
7. Enabling Standby File Management
When the primary database adds or drops a datafile, the corresponding action should also be automatically taken on the standby database. This operation can be enabled using automated standby file management.
SQL> show parameter STANDBY_FILE_MANAGEMENT

SQL> alter system set STANDBY_FILE_MANAGEMENT=AUTO scope=both sid='*';

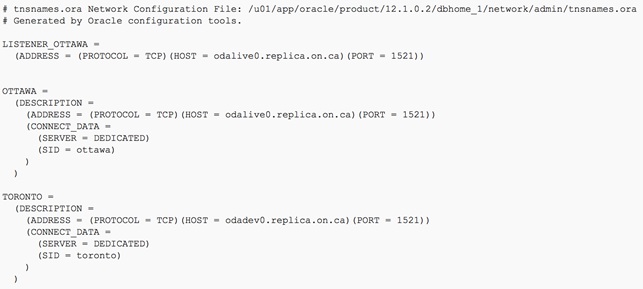
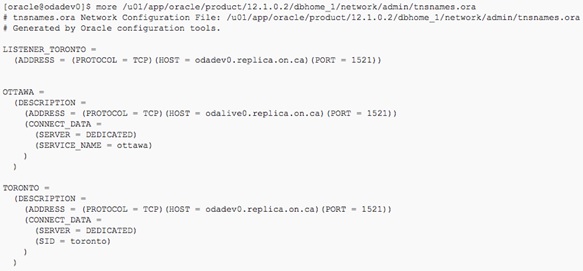
8. Setup TNS Entries
Oracle Net Service Names must be configured to enable redo transportation across the databases. Update tnsnames.ora file to include the TNS alias for both primary and standby databases.
ODALIVE0
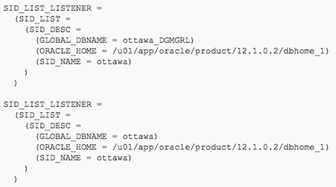
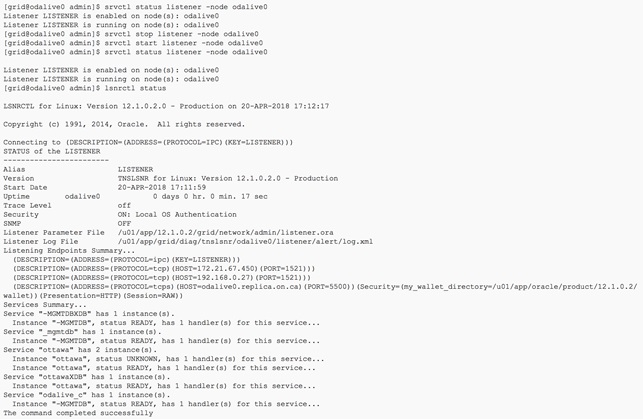
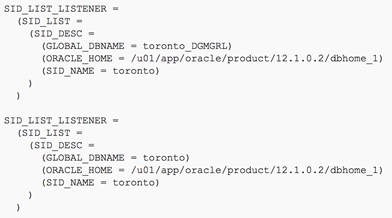
9. Set up the listener.ora files for “ottawa” DB to include entries for the Dataguard broker.
ODALIVE0
10. Restart listener on ODALIVE0 as “grid” user for changes to take effect.
ODALIVE0
[grid@odalive0 admin]$ srvctl status listener -node odalive0

[grid@odalive0 admin]$ srvctl stop listener -node odalive0

[grid@odalive0 admin]$ srvctl start listener -node odalive0

[grid@odalive0 admin]$ srvctl status listener -node odalive0

[grid@odalive0 admin]$ lsnrctl status
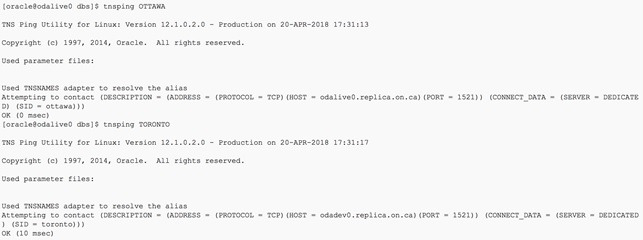
11. Validate Network Connectivity
At this stage, Oracle Net should be able to resolve the TNS aliases for both the primary and standby.
ODALIVE0
[oracle@odalive0 dbs]$ tnsping OTTAWA

[oracle@odalive0 dbs]$ tnsping TORONTO
12. Copy the “ottawa” DB password file from ODALIVE0 to ODADEV0

Standby “toronto” DB Configuration
13. Setup TNS Entries
Oracle Net Service Names must be configured to enable redo transportation across the databases. Update tnsnames.ora file to include the TNS alias for both primary and standby databases.
ODADEV0
14. Set up the listener.ora files for “ottawa” DB to include entries for the Dataguard broker.
ODADEV0
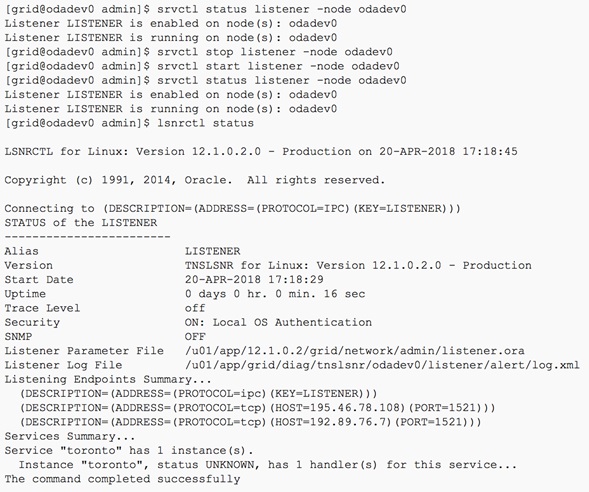
15. Restart listener on ODADEV0 as “grid” user for changes to take effect.
ODADEV 0
[grid@odadev0 admin]$ srvctl status listener -node odadev0

[grid@odadev0 admin]$ srvctl stop listener -node odadev0

[grid@odadev0 admin]$ srvctl start listener -node odadev0

[grid@odadev0 admin]$ srvctl status listener -node odadev0

[grid@odadev0 admin]$ lsnrctl status
16. Creation of “toronto” audit directory on ODADEV0
$ mkdir -p /u01/app/oracle/admin/toronto/adump
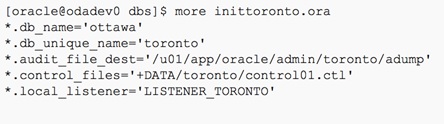
17. Creation of pfile on ODADEV0 for “toronto” DB with the following contents.
Compare with the pfile of the primary database and make note of the locations of the datafiles, audit trail and controlfile and ensure the relevant directories exist on the standby DB server.
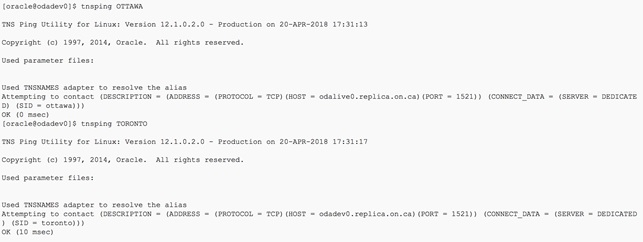
18. Validate Network Connectivity
At this stage, Oracle Net should be able to resolve the TNS aliases for both the primary and standby
[oracle@odadev0]$ tnsping OTTAWA

[oracle@odadev0]$ tnsping TORONTO
ODADEV0
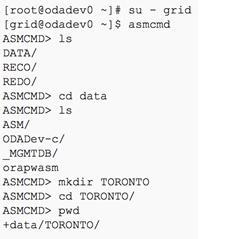
19. Create directory in +DATA in ASM ON ODADEV0 for the control file.
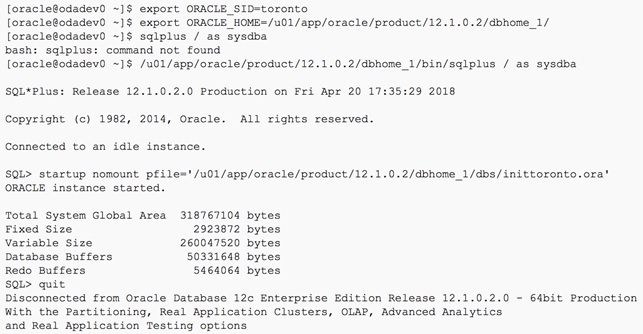
20. On ODADEV0, set the “toronto” DB environment variables
$ export ORACLE_SID=toronto
$ export ORACLE_HOME=/u01/app/oracle/product/12.1.0.2/dbhome_1/
21. Start the auxiliary instance on ODADEV0 using the pre-created init.ora file
SQL> startup nomount pfile='/u01/app/oracle/product/12.1.0.2/dbhome_1/dbs/inittoronto.ora'
ORACLE instance started.
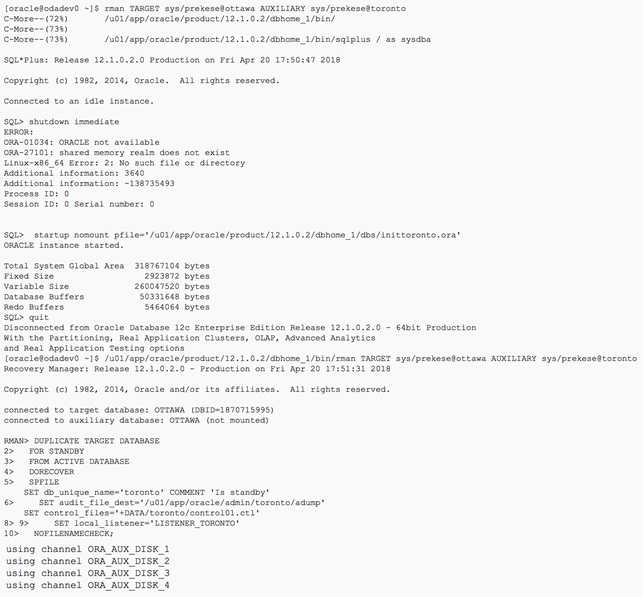
22. Still on ODADEV0, connect to RMAN, specifying both Target and Auxiliary DB. “ottawa” DB & “toronto” DB
Ensure that you are using the same sys password you use for the primary DB since we have already copied over the password file from the primary DB.
[oracle@odadev0 ~]$ rman TARGET sys/prekese@ottawa AUXILIARY sys/prekese@toronto

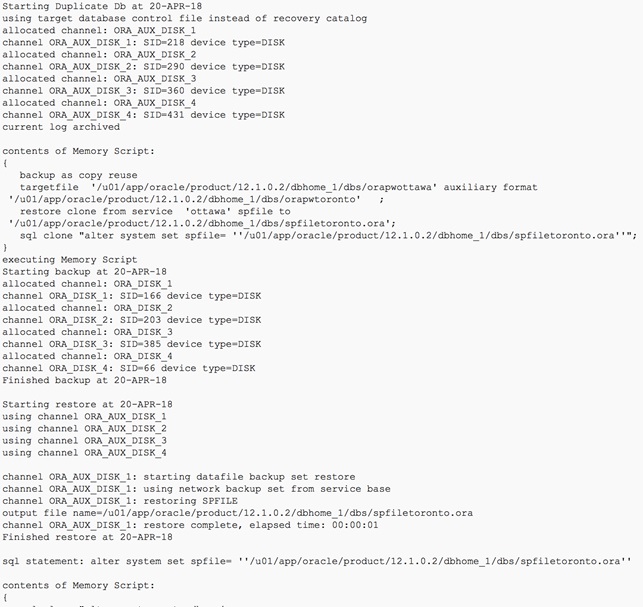
23. Duplicate “ottawa” DB into “toronto” with RMAN on ODADEV0
DUPLICATE TARGET DATABASE

  FOR STANDBY

  FROM ACTIVE DATABASE

  DORECOVER

  SPFILE

  SET db_unique_name='toronto' COMMENT 'Is standby'

  SET audit_file_dest='/u01/app/oracle/admin/toronto/adump'

  SET control_files='+DATA/toronto/control01.ctl'

  NOFILENAMECHECK;
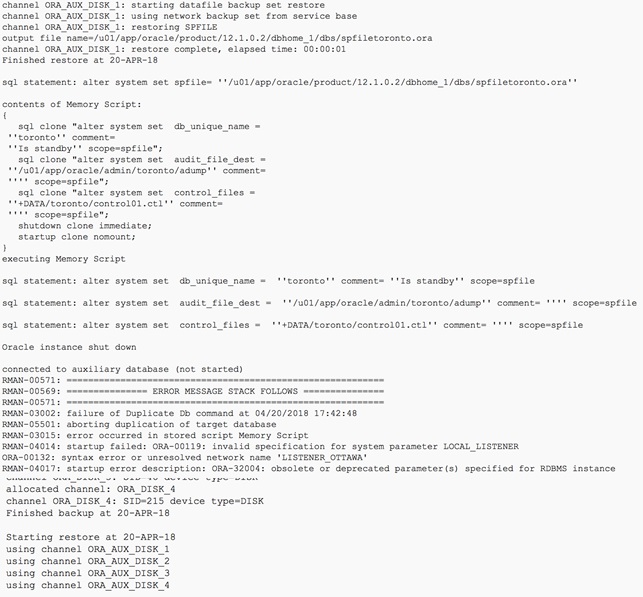
The error in the attached is requesting for a proper definition of the “LOCAL_LISTENER” parameter defined in the spfile automatically copied from the primary DB. Since we are on the “toronto” db, the parameter must be adjusted accordingly in the duplicate command.
DUPLICATE TARGET DATABASE

  FOR STANDBY

  FROM ACTIVE DATABASE

  DORECOVER

  SPFILE

  SET db_unique_name='toronto' COMMENT 'Is standby'

  SET audit_file_dest='/u01/app/oracle/admin/toronto/adump'

  SET control_files='+DATA/toronto/control01.ctl'

  SET local_listener='LISTENER_TORONTO'

  NOFILENAMECHECK;

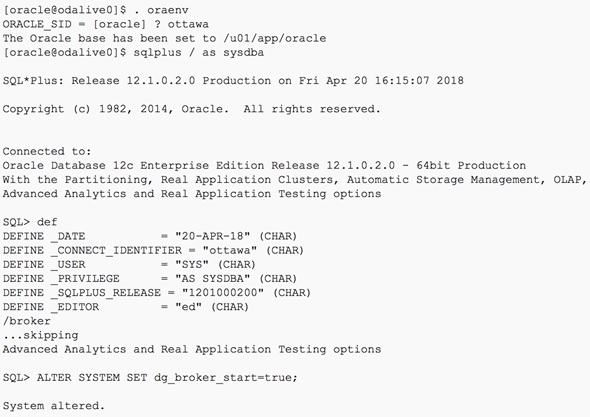
24. Enable Dataguard Broker by logging into SQLPLUS on both primary DB and standby and launching the following
OTTAWA
SQL> ALTER SYSTEM SET dg_broker_start=true;
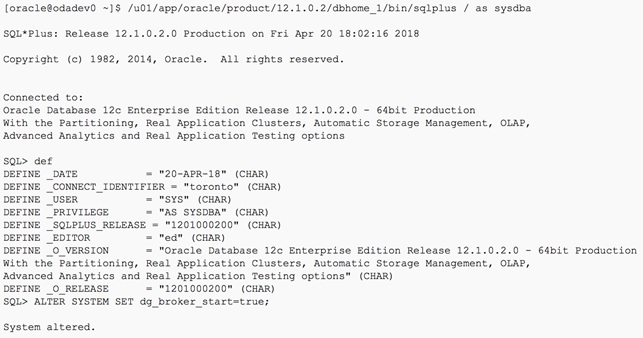
TORONTO
SQL> ALTER SYSTEM SET dg_broker_start=true;
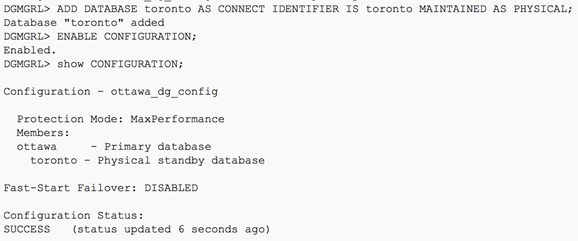
25.On ODALIVE0, issue the following to register the “ottawa” DB with the broker
$ dgmgrl sys/*****@ottawa

Connected as SYSDBA.

DGMGRL> CREATE CONFIGURATION ottawa_dg_config AS PRIMARY DATABASE IS ottawa CONNECT IDENTIFIER IS ottawa;

26. Now still on ODALIVE0 we add “toronto” DB to the DG configuration, enable and verify the configuration
DGMGRL> ADD DATABASE toronto AS CONNECT IDENTIFIER IS toronto MAINTAINED AS PHYSICAL;
DGMGRL>
DGMGRL> ENABLE CONFIGURATION;
Enabled.
DGMGRL>
DGMGRL> SHOW CONFIGURATION;
DGMGRL> SHOW DATABASE ottawa;
DGMGRL> SHOW DATABASE toronto;
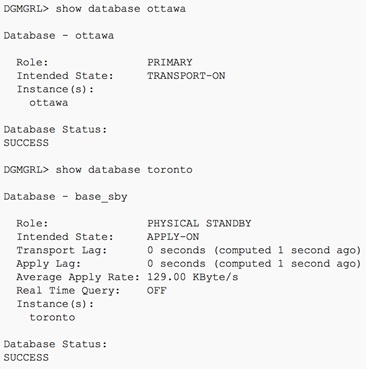
27. Verification from dg broker (using dgmgrl)
$ dgmgrl
DGMGRL> connect sys/xxxxx@ottawa
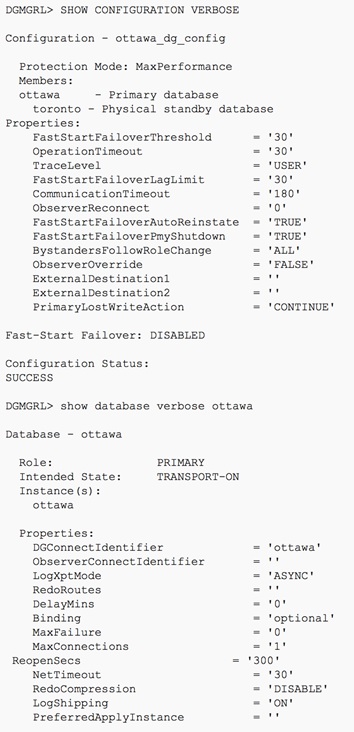
DGMGRL> show configuration verbose
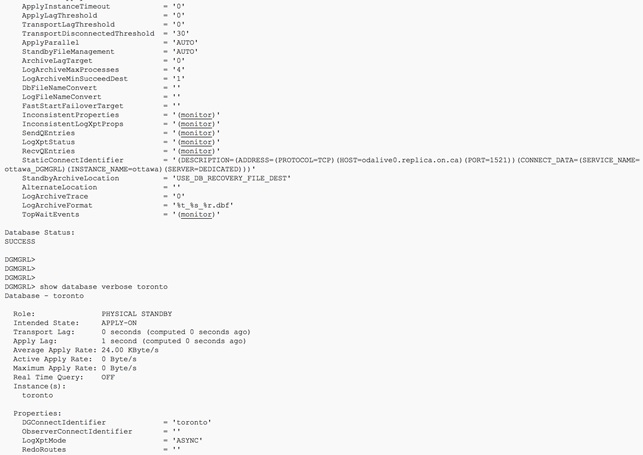
DGMGRL> show database verbose ottawa
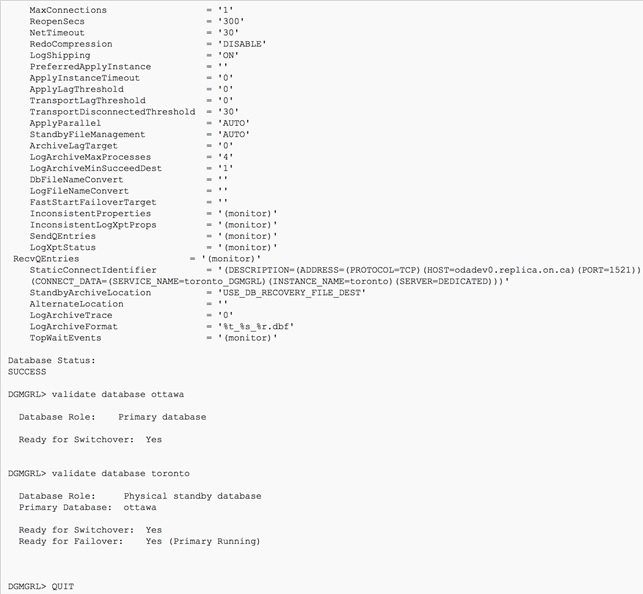
DGMGRL> show database verbose toronto
DGMGRL> validate database ottawa
DGMGRL> validate database toronto
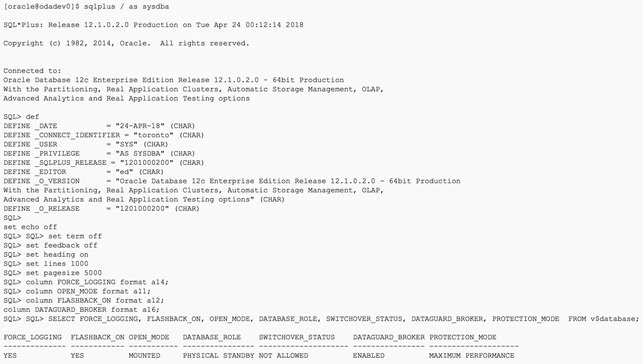
28. Verification of configuration on ODADEV0 “toronto” DB
$ sqlplus / as sysdba
set echo off

set term off

set feedback off

set heading on

set lines 1000

set pagesize 5000

column FORCE_LOGGING format a14;

column OPEN_MODE format a11;

column FLASHBACK_ON format a12;

column DATAGUARD_BROKER format a16;

SELECT FORCE_LOGGING, FLASHBACK_ON, OPEN_MODE, DATABASE_ROLE, SWITCHOVER_STATUS, DATAGUARD_BROKER, PROTECTION_MODE  FROM v$database;
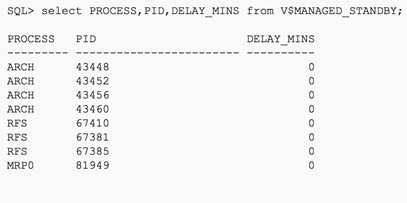
SQL> select PROCESS,PID,DELAY_MINS from V$MANAGED_STANDBY;
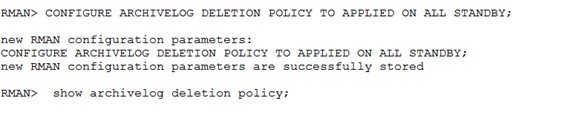
29. Configure archive log deletion policy on primary DB RMAN.
RMAN> show archivelog deletion policy;
30. Switchover tests
We can switch the role of the primary database and a standby database using the SWITCHOVER command. Before issuing the SWITCHOVER command, we must ensure:
- The state of the primary and standby databases areTRANSPORT-ON and APPLY-ON, respectively.
- All participating databases are in good health, without any errors or warnings present.
- Standby redo log files on the primary database are set up, and theLogXptMode configurable database property is set to SYNC if the configuration is operating in either maximum availability mode or maximum protection mode.
$ dgmgrl

DGMGRL> connect sys/xxxxxx@ottawa

DGMGRL> SHOW DATABASE VERBOSE ‘ottawa’;

DGMGRL> SHOW DATABASE VERBOSE ‘toronto’;

DGMGRL> switchover to toronto;
To Switch back
 $ dgmgrl

DGMGRL> connect sys/xxxxxx@toronto

DGMGRL> switchover to ottawa;
References:
https://docs.oracle.com/database/121/DGBKR/sofo.htm#DGBKR330
https://docs.oracle.com/database/121/SBYDB/create_ps.htm#SBYDB00200
More from this Author
Encountering errors can often lead us down a rabbit hole of troubleshooting and investigative work. Recently, a scenario encountered highlighted the ... Read More
Introduction: Creating a clone of a remote pluggable database across a database link can be a powerful tool for managing and replicating data across ... Read More