OCI FortiGate HA Cluster – Reference Architecture: Code Review and Fixes
Introduction OCI Quick Start repositories on GitHub are collections of Terraform scripts and configurations provided by Oracle. These repositories ... Read More
Learn more about why Eclipsys has been named the 2023 Best Workplaces in Technology and Ontario, Certified as a Great Place to Work in Canada and named Canada’s Top SME Employer!
Learn more!
Did you ever want to have labs where you could play with different hypervisors within a single virtual machine on your laptop? I know this sounds more like an INCEPTION remake than a decent requirement but you can’t blame us for being greedy knowing all that tools like VirtualBox can help us do nowadays.
To give more context to this issue. I have been playing with KVM lately when I realized that I was actually installing a Hypervisor inside a guest machine within another Hypervisor. Pretty weird indeed when you think of it, but I only stopped because a tool was complaining that no Hypervisor was recognized.
So, how to make a Hypervisor (KVM) aware of the Host hardware when it’s only installed under another Hypervisor layer (VirtualBox)? This is called nested Virtualization
Well, after digging a little online, it turns out that the latest versions of VirtualBox do provide this feature and it is very simple to enable even after your VM has been provisioned.
1. Environment
Host: Intel-based Dell laptop with windows 10
Hypervisor: VirtualBox
Guest OS: Oracle Linux 7
Hypervisor installed within the guest: KVM
Issue description from KVM.org:
For KVM to run from a VM it needs access to a set of CPU instructions (intel VT or AMD) to enable running fully isolated virtual machines at native hardware speeds (HVM ). Learn more.
2. Symptoms
In my case the Host CPU socket is intel hence I would be looking whether Intel VT (Virtualization Technology) is listed as virtualization capability on the guest machine.
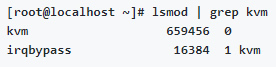
– So I ran the below which should display 2 if intel Virtualization capability is enabled. I got 0
![]()
– Alternatively, you can also check if nested virtualization is enabled in kvm (kvm_intel). Still nothing
3. Solution
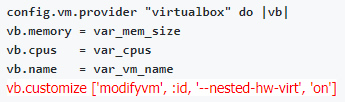
All you have to do is to make sure your VirtualBox is of version 6.1.4 and from there you can “activate” nested virtualization. Use either one of the below options.
![]()
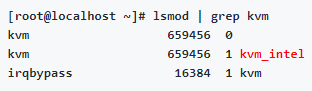
Here is the result of to same lsmod command after applying the change.
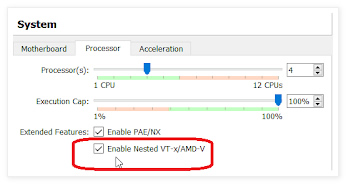
Another quick way to check if the change is effective is by opening the processor setting tab in VirtualBox.
Introduction OCI Quick Start repositories on GitHub are collections of Terraform scripts and configurations provided by Oracle. These repositories ... Read More

Introduction So far, I have used Oracle AutoUpgrade, many times in 3 different OS’. Yet the more you think you’ve seen it all and reached the ... Read More