OLVM: Upgrade from 4.4 to 4.5
Introduction VMware vSphere has long held the crown as the leading on-premises server virtualization solution across businesses of all sizes. Its ... Read More
Découvrez pourquoi Eclipsys a été nommée 2023 Best Workplaces in Technology, Great Place to Work® Canada et Canada's Top 100 SME !
En savoir plus !
I hope the last few articles were helpful to start a new journey with OLVM (Oracle Linux Virtual Manager). As we configured the KVM on the OLVM environment the next step is to configure the storage domain. VMs disks and snapshots are stored under storage domains.
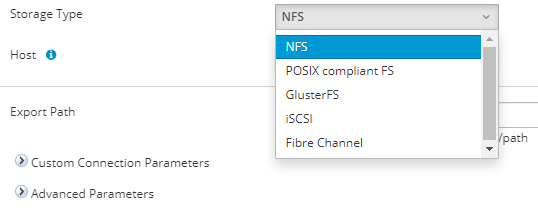
OLVM supports 4 types of storage types:

What is the Storage Domain?
A storage domain is a collection of images that have a common storage interface. A storage domain contains complete images of templates, virtual machines, virtual machine snapshots, or ISO files. Oracle Linux Virtualization Manager supports storage domains that are block devices (SAN – iSCSI or FCP) or a file system (NAS – NFS or Gluster).
Last few decades SAN technologies have improved drastically. There are many redundancy mechanisms like mirroring, RAID 5, RAID 6, and RAID 6 +1 to achieve data redundancy. To achieve 2 layers of data redundancy we can use the distributed file system. GlusterFS is an OLVM support cluster distributed file system. GlusterFS has the feature of creating replicated volumes for distributed databases.
What is GlusterFS?
GlusterFS is a distributed file system defined to be used in user space. For example File System in User Space (FUSE). It is a software-based file system that accounts for its own flexibility feature.
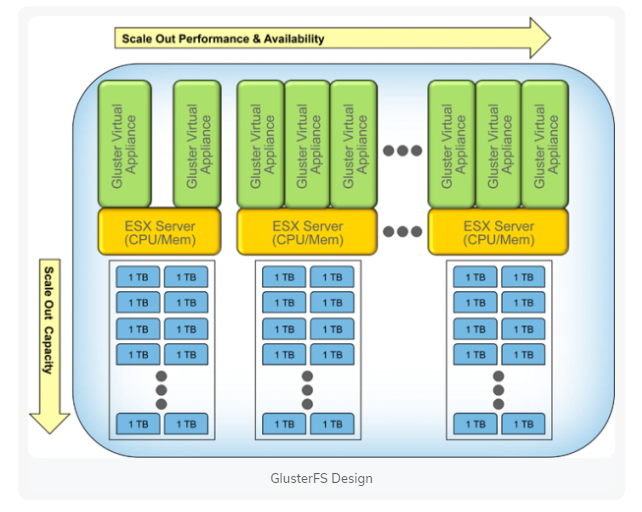
Figure 1 illustrates schematically represents the position of GlusterFS in a hierarchical model. By default TCP protocol will be used by GlusterFS.

Figure 1: GlusterFS hierarchical model
I have listed the benefits that come with GlusterFS.
Refer to https://www.tecmint.com/introduction-to-glusterfs-file-system-and-installation-on-rhelcentos-and-fedora/ link they get more understanding of the GFS.
In this article, we will focus on configuring the GlusterFS replicated volumes and how to integrate this with OLVM. For this configuration, we are going to use KVM hosts as the Gluster FS server and the client. Also shared oracle documentation for configuration Glusterfs.
https://docs.oracle.com/en/learn/gluster-oracle-linux/index.html#create-the-trusted-storage-pool
Let’s start with installing the GFS server RPMs.
Installed Required RPMs
We need to install GlusterFS server rpm to enable the Gluster Server Services.
## Enable access to the Gluster packages
sudo dnf install oracle-gluster-release-el8 -y
sudo dnf config-manager --enable ol8_gluster_appstream ol8_baseos_latest ol8_appstream

## Install the Gluster server packages.
sudo dnf install @glusterfs/server -y
Enable the GFS Services
Once the GFS server RPM installation is complete enable the Gluster services and add the GFS service to the firewall rule.
sudo systemctl enable --now glusterd
Configure the firewall to allow traffic on the ports that are specifically used by Gluster.
sudo firewall-cmd --permanent --add-service=glusterfs
sudo firewall-cmd --reload
We need to create a partition and make an XFS file system for GFS bricks. Make sure not to write anything directly on the brick.
$ sudo fdisk /dev/mapper/3624a93701561d6718da94a2000011014
$ sudo mkfs.xfs -f -i size=512 -L glusterfs /dev/mapper/3624a93701561d6718da94a2000011014p1
$ sudo mkdir -p /nodirectwritedata/glusterfs/brick1
$ sudo echo 'LABEL=glusterfs /nodirectwritedata/glusterfs/brick1 xfs defaults 0 0' >> /etc/fstab
$ mount -a
$ sudo mkdir /nodirectwritedata/glusterfs/brick1/gvol0
$ df -H
This is how it looks after adding the disk from the SAN. Make sure disks are not shared among both the KVM servers.
[root@KVM01 ~]# lsblk
NAME                                    MAJ:MIN RM  SIZE RO TYPE  MOUNTPOINT
sda                                       8:0    0 59.6G  0 disk
├─sda1                                    8:1    0    4G  0 part
│ └─md127                                 9:127  0    4G  0 raid1 [SWAP]
├─sda2                                    8:2    0    2G  0 part
│ └─md125                                 9:125  0    2G  0 raid1 /boot/efi
└─sda3                                    8:3    0 53.6G  0 part
  └─md126                                 9:126  0 53.6G  0 raid1 /
sdb                                       8:16   0 59.6G  0 disk
├─sdb1                                    8:17   0    4G  0 part
│ └─md127                                 9:127  0    4G  0 raid1 [SWAP]
├─sdb2                                    8:18   0    2G  0 part
│ └─md125                                 9:125  0    2G  0 raid1 /boot/efi
└─sdb3                                    8:19   0 53.6G  0 part
  └─md126                                 9:126  0 53.6G  0 raid1 /
sdc                                       8:32   1 14.4G  0 disk
└─sdc1                                    8:33   1 14.4G  0 part
sdd                                       8:48   0    2T  0 disk
└─3624a93701561d6718da94a2000011014     252:0    0    2T  0 mpath
sdf                                       8:80   0    2T  0 disk
└─3624a93701561d6718da94a2000011014     252:0    0    2T  0 mpath
sdh                                       8:112  0    2T  0 disk
└─3624a93701561d6718da94a2000011014     252:0    0    2T  0 mpath
sdi                                       8:128  0    2T  0 disk
└─3624a93701561d6718da94a2000011014     252:0    0    2T  0 mpath
[root@KVM01 ~]#
I would recommend it’s better to create LVM, which gives the flexibility to expand the disk later for future space requirements.
fdisk /dev/mapper/3624a93701561d6718da94a2000011014
-- n -- create new partition
-- t -- set 8e for LVM
-- w -- save and exit
Expected output after formatting disk with xfs file system and mounting the data :
[root@KVM01 brick1]# mkfs.xfs -f -i size=512 -L glusterfs /dev/mapper/GFS_PROD_VG-GFS_PROD_LV
meta-data=/dev/mapper/GFS_PROD_VG-GFS_PROD_LV isize=512    agcount=4, agsize=120796160 blks
         =                       sectsz=512   attr=2, projid32bit=1
         =                       crc=1        finobt=1, sparse=1, rmapbt=0
         =                       reflink=1    bigtime=0 inobtcount=0
data     =                       bsize=4096   blocks=483184640, imaxpct=5
         =                       sunit=0      swidth=0 blks
naming   =version 2              bsize=4096   ascii-ci=0, ftype=1
log      =internal log           bsize=4096   blocks=235930, version=2
         =                       sectsz=512   sunit=0 blks, lazy-count=1
realtime =none                   extsz=4096   blocks=0, rtextents=0
Discarding blocks...Done.
[root@KVM01 brick1]#

-- After mounting brick

[root@KVM01 brick1]# df -h
Filesystem                                       Size  Used Avail Use% Mounted on
devtmpfs                                         377G     0  377G   0% /dev
tmpfs                                            378G   12K  378G   1% /dev/shm
tmpfs                                            378G   11M  378G   1% /run
tmpfs                                            378G     0  378G   0% /sys/fs/cgroup
/dev/md126                                        53G  7.4G   43G  15% /
/dev/mapper/3624a93701561d6718da94a2000011014p1  2.0T   15G  2.0T   1% /nodirectwritedata/glusterfs/brick1
/dev/md125                                       2.0G  5.1M  2.0G   1% /boot/efi
tmpfs                                             76G   16K   76G   1% /run/user/42
tmpfs                                             76G  4.0K   76G   1% /run/user/1000
As we have already installed the GFS server RPMs, now we can discover the GFS peer using the Gluster peer probe command.
-- Execute Peer probe on both the nodes
[root@KVM10 zones]# gluster peer probe KVM01.local.ca
peer probe: success
[root@KVM120 zones]#
[root@KVM01 ~]# gluster pool list
UUID                                    Hostname        State
b744a4e1-fd30-4caa-b4ac-db9fd22cb4c3    KVM01.local.ca  Connected
9a5d68c4-6ca2-459f-a1eb-110225b393a1    localhost       Connected
[root@KVM01 ~]#

[root@KVM02 ~]# gluster pool list
UUID                                    Hostname        State
9a5d68c4-6ca2-459f-a1eb-110225b393a1    KVM02.local.ca  Connected
b744a4e1-fd30-4caa-b4ac-db9fd22cb4c3    localhost       Connected
[root@KVM02 ~]#
The next step is to create replicated volume for GFS “gluster volume create gvol0 replica 2 KVM01:/nodirectwritedata/glusterfs/brick1/gvol0 KVM02:/nodirectwritedata/glusterfs/brick2/gvol0”
# gluster volume create gvol0 replica 2 KVM01:/nodirectwritedata/glusterfs/brick1/gvol0 KVM02:/nodirectwritedata/glusterfs/brick2/gvol0

[root@KVM01 ~]# gluster volume create gvol0 replica 2 KVM120:/nodirectwritedata/glusterfs/brick1/gvol0 KVM121:/nodirectwritedata/glusterfs/brick2/gvol0
Replica 2 volumes are prone to split-brain. Use Arbiter or Replica 3 to avoid this. See: http://docs.gluster.org/en/latest/Administrator%20Guide/Split%20brain%20and%20ways%20to%20deal%20with%20it/.
Do you still want to continue?
 (y/n) y
volume create: gvol0: success: please start the volume to access data
Now we need to start the volume gvol0.
-- Start the Volume
gluster volume start gvol0
-- Validate the volume status
[root@KVM01 ~]#  gluster volume info
Volume Name: gvol0
Type: Replicate
Volume ID: da22b70e-7929-41d3-95f1-542e2220b10a
Status: Started
Snapshot Count: 0
Number of Bricks: 1 x 2 = 2
Transport-type: tcp
Bricks:
Brick1: KVM01:/nodirectwritedata/glusterfs/brick1/gvol0
Brick2: KVM02:/nodirectwritedata/glusterfs/brick2/gvol0
Options Reconfigured:
storage.fips-mode-rchecksum: on
transport.address-family: inet
nfs.disable: on
performance.client-io-threads: off
[root@KVM121 ~]# gluster volume status
Status of volume: gvol0
Gluster process                             TCP Port  RDMA Port  Online  Pid
------------------------------------------------------------------------------
Brick KVM01:/nodirectwritedata/glusterfs/b
rick1/gvol0                                 49152     0          Y       7208
Brick KVM02:/nodirectwritedata/glusterfs/b
rick2/gvol0                                 49152     0          Y       7197
Self-heal Daemon on localhost               N/A       N/A        Y       7214
Self-heal Daemon on KVM120                  N/A       N/A        Y       7225
Task Status of Volume gvol0
------------------------------------------------------------------------------
There are no active volume tasks

[root@KVM01 ~]#
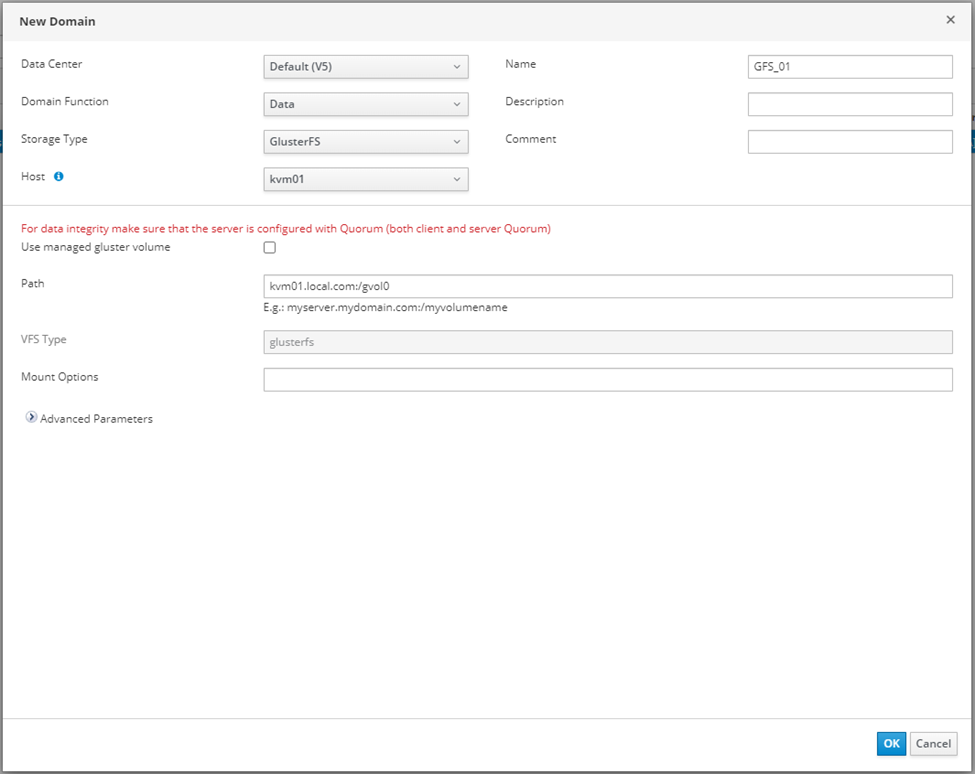
GFS volume creation is complete, the next big step is to integrate GFS volume with OLVM. If you have two KVM hosts, I would recommend you mount this using localhost:/gvol0. This enables you to mount the same volume on both servers and the VM disk image will replicate on both sites.

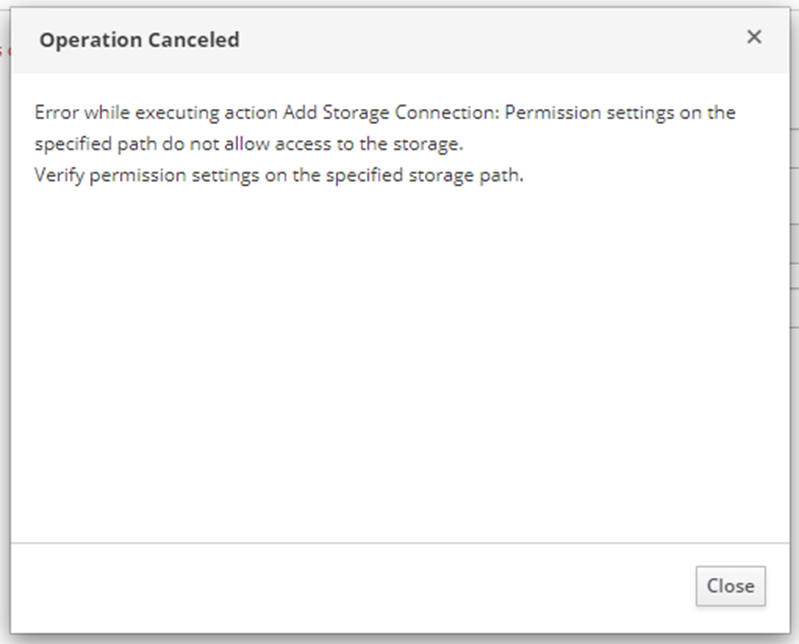
The error you will face while configuring the GFS data domain.

Solution
In OLVM files should be owned by VDSM and KVM. In this case, navigate the volume folder in brick and change the ownership to vdsm:KVM, and change permission to 775.
cd /nodirectwritedata/glusterfs/brick1/
chown -R 36:36 gvol0
chmod -R 775 gvol0

cd /nodirectwritedata/glusterfs/brick2/
chown -R 36:36 gvol0
chmod -R 775 gvol0
Once this is complete this will be mounted in green color.
This should be marked with green color status Also this will OLVM to start the data center. you cannot start the data center without a data domain.

Storage technologies are changing at a rapid pace. Having a distributed file system on top of the storage technology (RAID6+1) makes data more redundant and secure. At the moment OLVM supports only GlusterFS as the distributed file system you do not require additional licenses for this cluster file system. Also, this is very easy to configure and it gives high storage throughput by eliminating the metadata read, even IOPS can be improved by adding more brinks for the GFS.
Next article I will cover VM creation from the ova template.
Introduction VMware vSphere has long held the crown as the leading on-premises server virtualization solution across businesses of all sizes. Its ... Read More
Introduction Monitoring plays a major part in mission-critical environments. Most businesses depend on IT infrastructure. As the ... Read More