Extend your local NFS to Oracle Cloud using Storage Gateway with Cloud Sync
One of the biggest challenges every sysadmin (system administrator) faces during cloud migration is transferring a large set of on-premises data to the cloud. If it is done manually, administrators have to spend a significant amount of time keeping their data migration jobs intact throughout the migration process. Further, manual data transferring processes could be buggy and prone to human errors. This could add risk to the project timeline or possible data corruption which could eventually lead to failure.
The solution is to use some sort of automation to keep your data migration process continuous and seamless. Oracle Storage Gateway helps you to integrate your data/application easily and seamlessly to the Oracle Cloud and move data back and forth without putting manual effort or modifying your application architecture.
Here is a brief explanation about Oracle Storage Gateway:
Oracle Storage Gateway is a type of gateway that lets you extend your on-premises data to the Oracle Cloud Infrastructure (OCI). Storage Gateway can be installed in an OCI compute instance or as a Linux Docker instance in your on-premises Data Centre. Applications store and retrieve objects from Object Storage through NFS (Network File Systems) created in Storage Gateway. Storage Gateway exposes an NFS mount point that can mount to any host that supports an NFSv4 client. Storage Gateway mount point maps to an Object Storage bucket in OCI.
If set up correctly, you can directly mount and use the Storage Gateway file system as a regular NFS mount within your applications. Oracle Storage Gateway caches frequently retrieve data on the local storage. This cache serves as both a read cache and a write buffer for data storage. The data retrieval minimizes the number of REST API calls to OIC Object Storage, therefore, enabling faster data retrieval. However, this method is ideal for infrequent data operations such as backup and archival. Point to remember, Oracle does not recommend using Storage Gateway as general-purpose network-attached storage. The sole purpose of having Storage Gateway is to move data to the cloud.
But if you have a frequently updated data set that needs to be migrated to the cloud, the best way to achieve it is to store in your local NFS and integrate it with a Storage Gateway server. You need to configure files on the local NFS to synchronize with the files on the Storage Gateway server. Using the Storage Gateway console or CLI, you can create a Cloud Sync job to synchronize the files from a local NFS server to an Object Storage-backed Storage Gateway NFS server and vice versa. In this article, I hope to discuss how to extend the on-premises NFS server to OCI object storage using Oracle Storage Gateway Cloud Sync feature.
The below diagram explains the simplified deployment architecture of Storage Gateway and how it works:
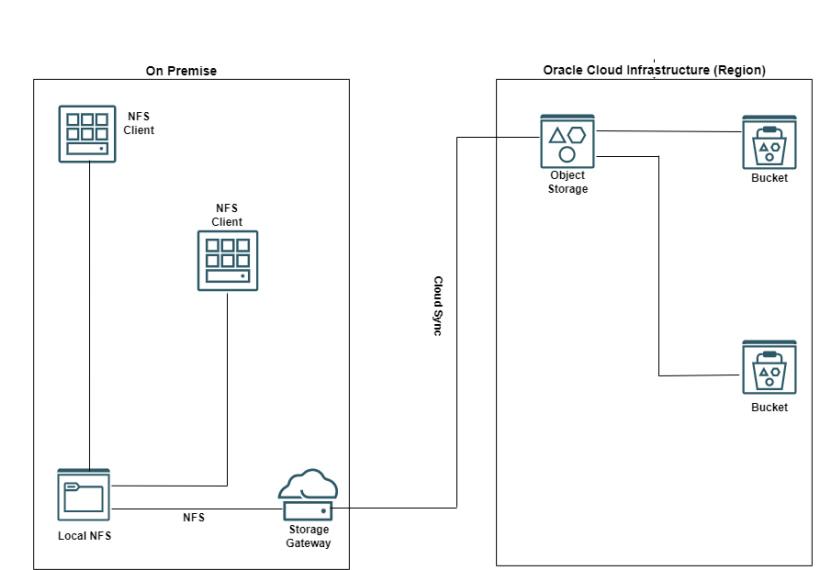
Let’s get right into configuring Cloyd Sync. I assume that you already have a local NFS server. Below I will be discussing high-level steps to configure Storage Gateway. Please refer to Oracle Storage Gateway documentation for the hardware and software recommendations and requirements. (https://docs.oracle.com/en-us/iaas/Content/StorageGateway/Tasks/installingstoragegateway.htm)
1. Download and extract the Storage Gateway tar archive from https://www.oracle.com/downloads/cloud/oci-storage-gateway-downloads.html

2. Run the installation script as sudo or root user.

At the end of the installation, you should get the management console and NFS share details as shown in the below image. We do not use the below NFS details to mount the file system. It is to mount the Storage Gateway file system directly with your NFS clients.

3. Using the Storage Gateway management console, set a new password for the admin user and log in. Now you are ready to create a file system.

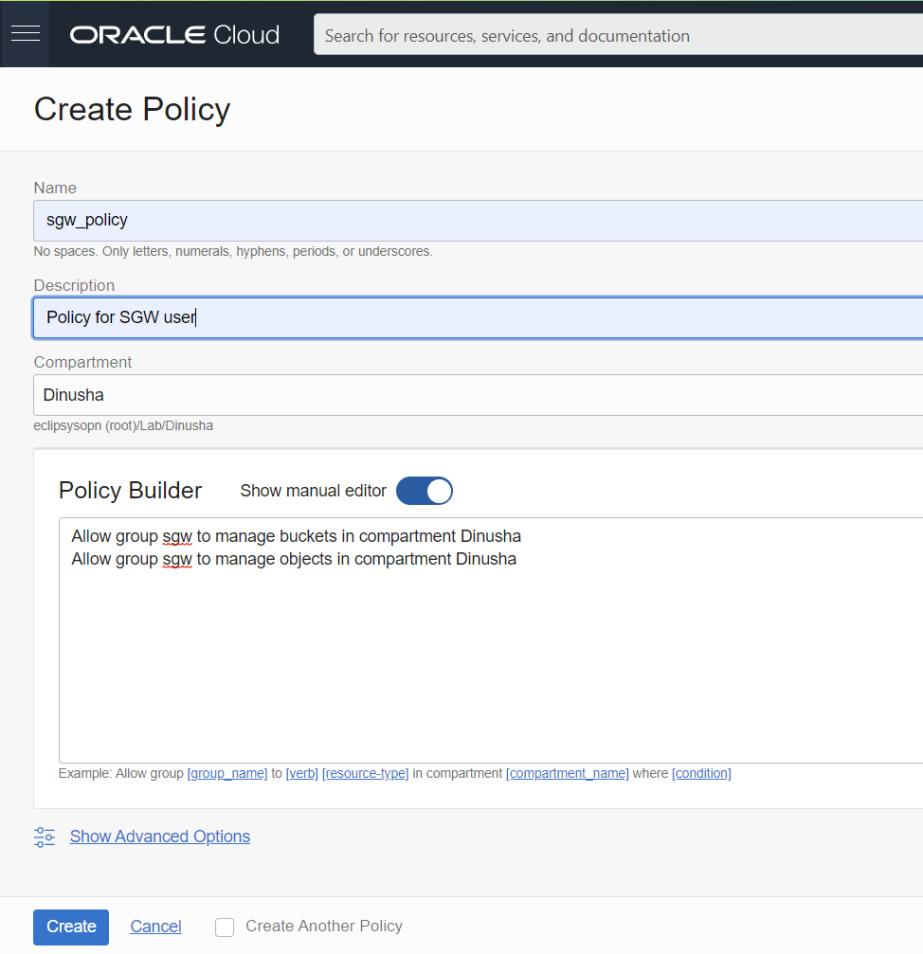
4. Before creating a file system, we need to configure an OCI user who has the privilege to perform object storage operations. Navigate to Identity & Security in your OCI console and create a user, a group, and assign the user to the group. Finally, create policies as per the below examples.
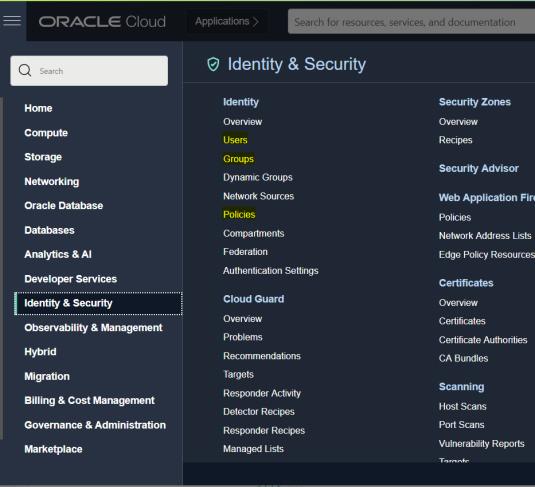
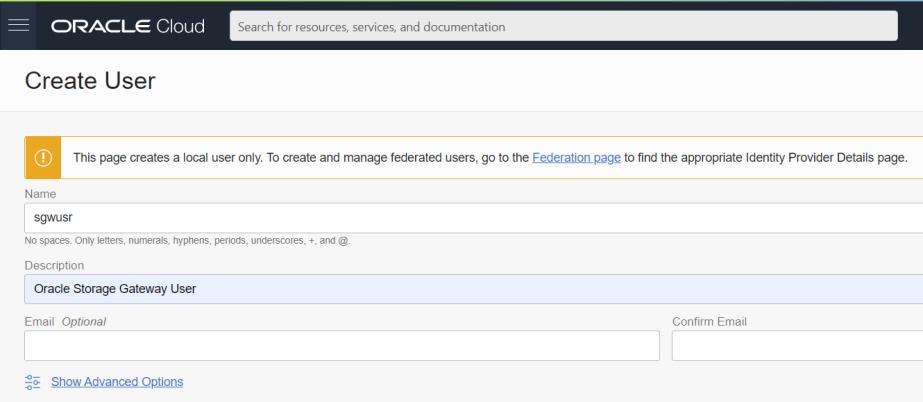
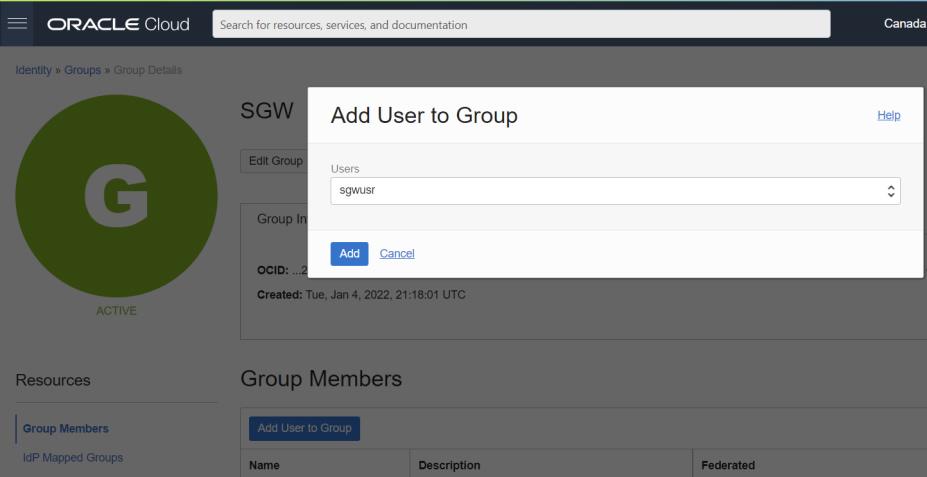
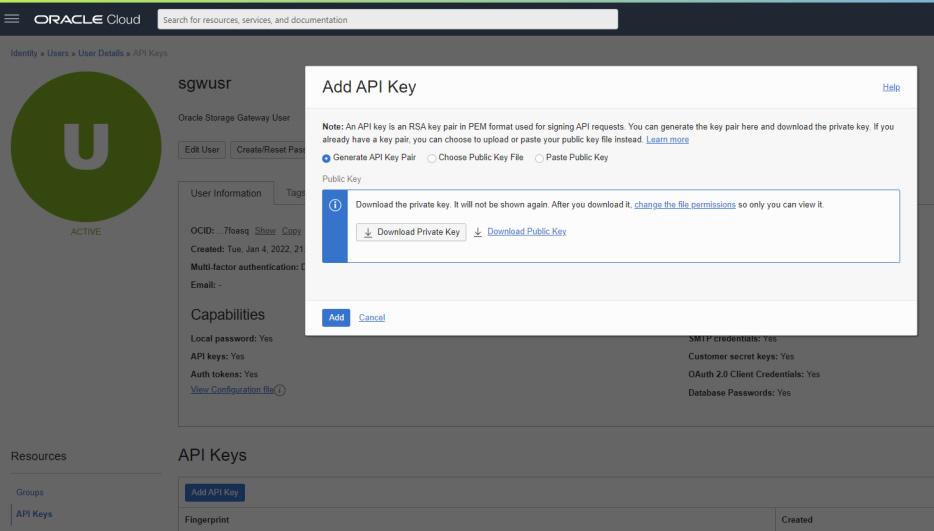
5. Navigate to the resources and create an API key for the user.
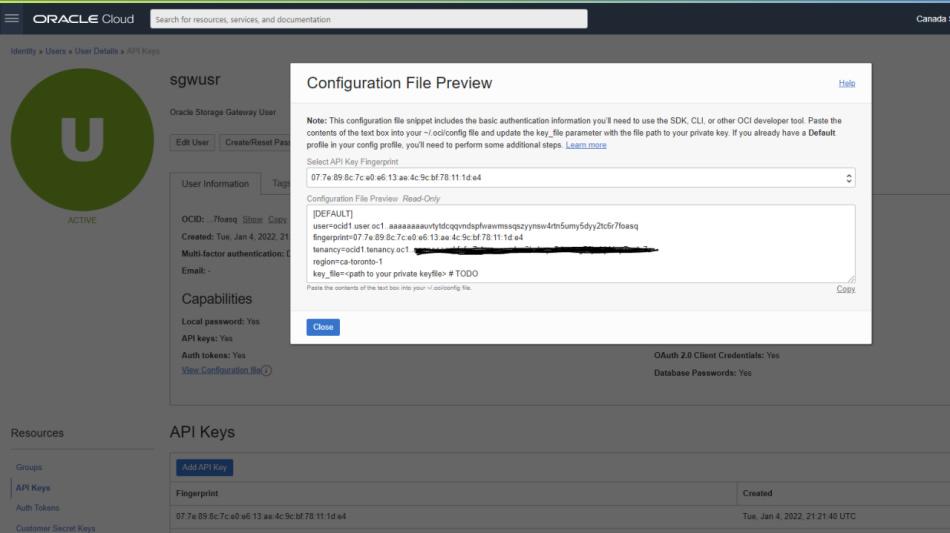
Once the key is added, you can view authentication information by navigating to the View Configuration file in the User Information section. Copy those configurations to a file. We will need them later.
6. Now it’s time to create file systems in the Storage Gateway server. Log in to the Storage Gateway console and navigate to the Create a File System page. Enter details we copied from step 5 as follows.
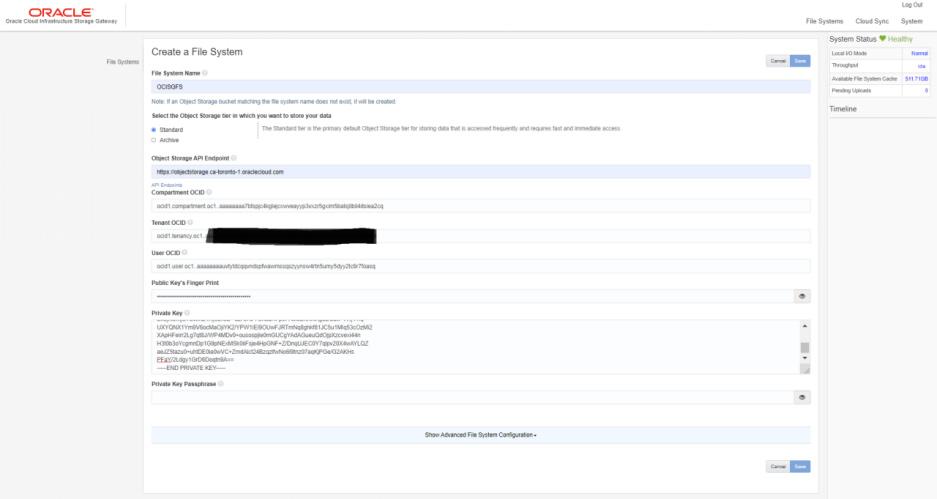
Once the above step is done, you should be able to connect to the file system successfully.

7. Now we have come to the final step. We need to create a Cloud Sync job to synchronize data from local NFS to Object storage via the Storage Gateway. For that, we need to mount the data directory in the local NFS server to the path of /cloudsync/mounts on the Storage Gateway.

Once the above steps are done, your data on local NFS should be visible to the Storage Gateway. Now we can create the Cloud Sync job and start it using the console.
8. Navigate to the Create Cloud Sync Job page and enter the following details.
Job Name: Any name. I gave CloudSyncJob1
Source Path: /cloudsync/mounts/upload <- upload is a user directory you need to sync
Target Path: OCISGFS/ <- This is the Storage Gateway file system
Optionally you can enable auto-deletion.
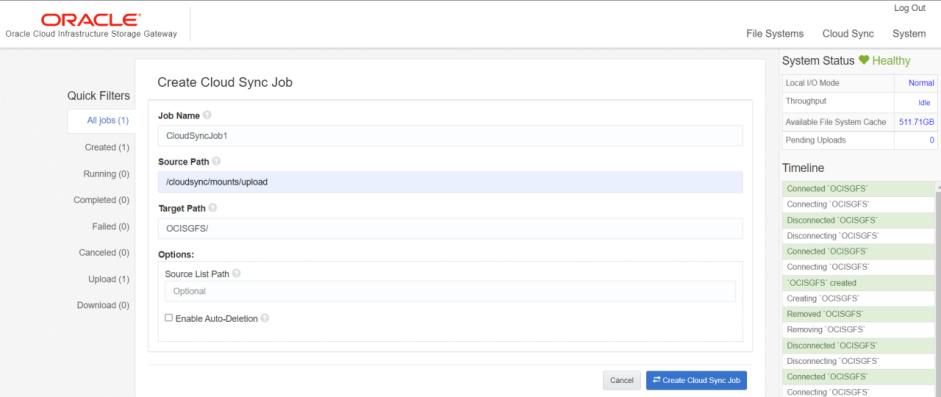
9. After the Cloud Sync job is created, you can run it through the console, or you can schedule it to run every X minute or hour on the Storage Gateway itself as a cron job. This is how you do it.
Create a shell script as follows:
ocisg cloudsync run CloudSyncJob1 >> runSyncLog.txt
Then schedule the script as follows.
[root@sgw ~]# crontab -l
*/5 * * * * ./runSync.sh
10. Now time for testing. In this demo, I used a fresh NFS installation. Therefore, we need to copy some files to the NFS directory for testing. Wait till the Cloud Sync job starts and observe if they are getting synchronized with OCI object storage.
I copied two files to the local NFS and let the sync job complete. It took almost 4 minutes to upload to the cloud storage. This could vary according to your Internet uplink speed.
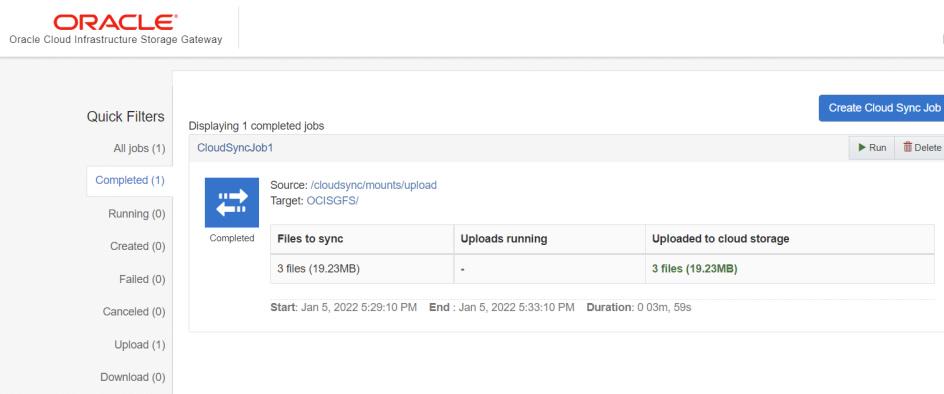
On the OCI console navigate to the object storage bucket and observe that files copied to the local NFS server have been uploaded to the object storage bucket.
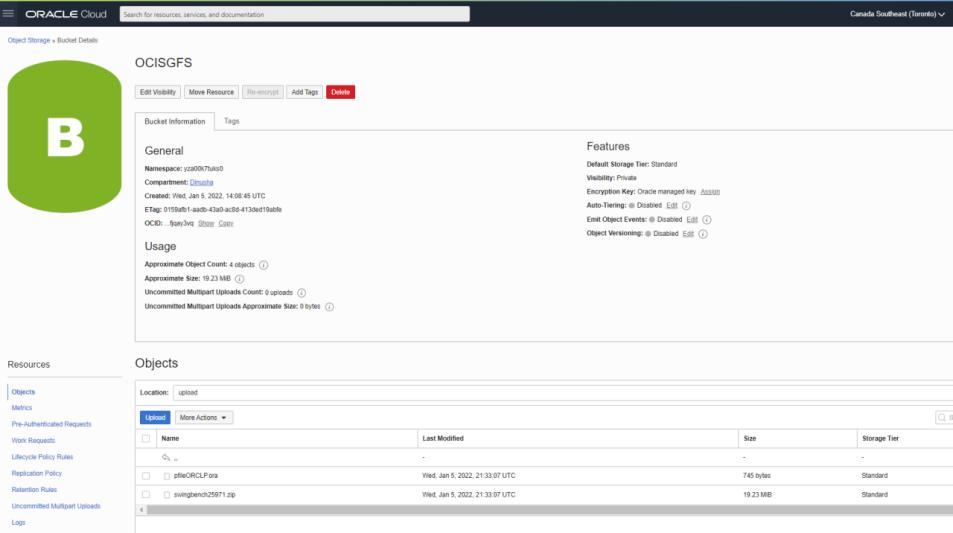
This concludes our configuration. As the final thought, using Storage Gateway Cloud Sync we can easily synchronize on-premises data to the cloud without any manual intervention. This not only saves your time but also protects your data integrity and consistency.
More from this Author
Objective: In one of our recent implementations, the customer requirement was to have the Red Hat Linux operating system for Oracle Database ... Read More
Introduction RMAN offers to transfer data between platforms in a multi-tenant setting. You can move an entire multitenant container database (CDB), ... Read More


