OCI FortiGate HA Cluster – Reference Architecture: Code Review and Fixes
Introduction OCI Quick Start repositories on GitHub are collections of Terraform scripts and configurations provided by Oracle. These repositories ... Read More
Learn more about why Eclipsys has been named the 2023 Best Workplaces in Technology and Ontario, Certified as a Great Place to Work in Canada and named Canada’s Top SME Employer!
Learn more!Almost every cloud provider has a Command Line Interface (CLI) which is a unified tool to manage cloud resources. In a previous post, I described how to configure Oracle Cloud infrastructure CLI. This time my focus is its AWS equivalent as I intend to explore different ways of provisioning instances in all major Cloud shops (OCI, AWS, Azure, GCP), and since my next article will depend on AWS-CLI, I will start with the configuration piece which I found easier than for OCI-CLI.
Context: This is part of a series of 4 articles that will build quick hands-on experiences on AWS provisioning.
Whether you install AWS-CLI on windows or on Linux the basic install will always require 2 elements:
Windows
1- Download and execute the following AWS-CLI installer https://s3.amazonaws.com/aws-cli/AWSCLISetup.exe
2- Follow the on-screen instructions. The AWS CLI version 1 will automatically install the correct version as follows
C:\Program Files\Amazon\AWSCLI
C:\Program Files (x86)\Amazon\AWSCLI for a 32-bit system.
3- Open the Environment Variable window and add the bin directory to the PATH variable
==> ”C:\Program Files\Amazon\AWSCLI\bin”

– Run the version command to confirm that AWS CLI was installed correctly.
C:\Users\kosse> aws --version
aws-cli/1.18.130 Python/3.6.0 Windows/10 botocore/1.17.53

C:\Users\kosse> where aws
   C:\Program Files\Amazon\AWSCLI\bin\aws.exe
I also had AWS-CLI installed on my windows subsystem for Linux (WSL) where the installation was done as follows :
brokedba~$ curl "https://s3.amazonaws.com/aws-cli/awscli-bundle.zip" -o "awscli-bundle.zip"
brokedba~$ unzip awscli-bundle.zip
brokedba~$ sudo ./awscli-bundle/install -i /usr/local/aws -b /usr/local/bin/aws

--- Run the version command to confirm it was installed correctly.
brokedba~$ aws --version
aws-cli/1.18.130 Python/2.7.12 Linux/4.4.0-18362-Microsoft botocore/1.17.53
brokedba~$ pip --version
pip 20.2.2 from /home/brokedba/.local/lib/python2.7/site-packages/pip (python 2.7)
brokdba:~$ pip install awscli
--- Run the version command to confirm it was installed correctly.
brokedba~$ aws --version
aws-cli/1.18.130 Python/2.7.12 Linux/4.4.0-18362-Microsoft botocore/1.17.53
brokedba@brokdba:~$ which aws
/usr/local/bin/aws
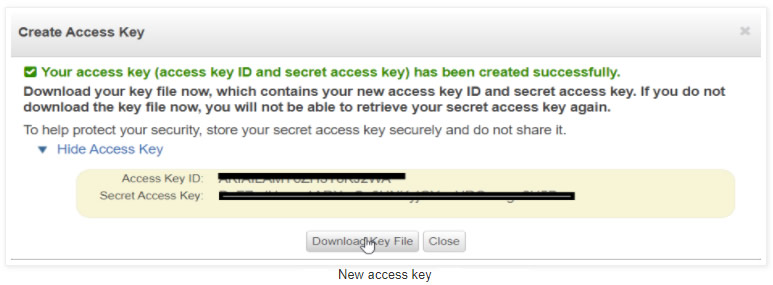
Once your AWS free Tier account is created, python and AWS CLI installed you will need to gather the required credentials as shown in the below setup tasks:

Click Create Access Keys under the “Access keys” section. You have the right to 2 Access keys as a Free Tier user
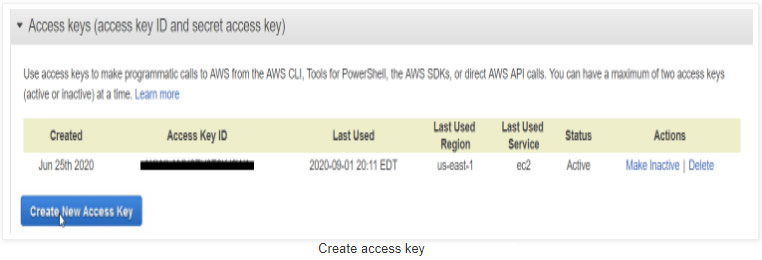
Note: You can always delete keys to recreate new ones if you reach the max amount of access keys or lost the key file.
Now that you have installed AWS CLI along with the access key info gathered in your CSV. file, you can finally configure your AWS-CLI with just the key id and the access key (region and output format are not credentials).To do so run the following:
$ aws configure
Access Key ID:
AKxxxxxxxxxxx
Secret Access Key:
Dsxxxxxxxxxxxxxxxxxxxxxxx
Default region name [us-east-1]:
Default output format [table]:
You can also add a profile when you have multiple AWS accounts to manage
$ aws configure --profile brokedba
Access Key ID:
AKxxxxxxxxxxx
Secret Access Key:
Dsxxxxxxxxxxxxxxxxxxxxxxx
Default region name [us-east-1]:
Default output format [table]:
– Below are details related to the current configuration and the files that were updated during setup:
Config files :
~/.aws/credentials ==> Supported by all SDKs and contain credentials only
~/.aws/config ==> Supported by CLI only and can contain credentials
$ aws configure list
      Name                    Value             Type    Location
      ----                    -----             ----    --------
   profile                             None    None
access_key     ****************J2WA shared-credentials-file
secret_key     ****************H5Bn shared-credentials-file
    region                us-east-1      config-file    ~/.aws/config
$ cat ~/.aws/credentials
[default]
aws_access_key_id = AKIXXXXXXXXXXXXXXXXXJ2WA
aws_secret_access_key = DsXXXXXXXXXXXXXX5Bn
[brokedba]
aws_access_key_id = AKIXXXXXXXXXXXXXXXXXJ2WA
aws_secret_access_key = DsXXXXXXXXXXXXXX5Bn
$ cat ~/.aws/config
[default]
output = table
region = us-east-1
[profile brokedba]
output = table
region = us-east-1
Few notions worth reminding before hitting the terminal with your favourite AWS-CLI requests :
A. Command structure: is based on the below components
$ aws <AWS service> <operation to perform> [one or more options & parameters]
Parameters:
Will be followed by their values, for example when specifying an instance id we want to describe or defining a name for a created key- pair. The value type can also vary (string, integer, JSON, list, binary,…)
B. Filters vs Query :
The –query option relies on JMSPath and its filtering is done at the client-side while —filters do it at the server level which is way faster and more efficient. I personally use filters to narrow my research and query to specify which field I want to display.
– To demonstrate the nuance here’s an example where we filter an AWS region using each option (filters and query)
$ aws ec2 describe-regions --query 'Regions[?RegionName==`us-west-2`]'
$ aws ec2 describe-regions --filters "Name=region-name,Values=us-west-2"
Examples
There are few requests that you can run to test your connectivity and practice with aws-cli. Below describe-* commands are good examples to start with.
$ aws ec2 describe-regions --query 'Regions[]'
-------------------------------------------------------------------------------
|                               DescribeRegions                               |
+-----------------------------------+-----------------------+-----------------+
|             Endpoint              |      OptInStatus      |   RegionName    |
+-----------------------------------+-----------------------+-----------------+
|  ec2.eu-north-1.amazonaws.com     |  opt-in-not-required  |  eu-north-1     |
|  ec2.ap-south-1.amazonaws.com     |  opt-in-not-required  |  ap-south-1     |
|  ec2.eu-west-3.amazonaws.com      |  opt-in-not-required  |  eu-west-3      |
|  ec2.eu-west-2.amazonaws.com      |  opt-in-not-required  |  eu-west-2      |
|  ec2.eu-west-1.amazonaws.com      |  opt-in-not-required  |  eu-west-1      |
|  ec2.ap-northeast-2.amazonaws.com |  opt-in-not-required  |  ap-northeast-2 |
|  ec2.ap-northeast-1.amazonaws.com |  opt-in-not-required  |  ap-northeast-1 |
|  ec2.sa-east-1.amazonaws.com      |  opt-in-not-required  |  sa-east-1      |
|  ec2.ca-central-1.amazonaws.com   |  opt-in-not-required  |  ca-central-1   |
|  ec2.ap-southeast-1.amazonaws.com |  opt-in-not-required  |  ap-southeast-1 |
|  ec2.ap-southeast-2.amazonaws.com |  opt-in-not-required  |  ap-southeast-2 |
|  ec2.eu-central-1.amazonaws.com   |  opt-in-not-required  |  eu-central-1   |
|  ec2.us-east-1.amazonaws.com      |  opt-in-not-required  |  us-east-1      |
|  ec2.us-east-2.amazonaws.com      |  opt-in-not-required  |  us-east-2      |
|  ec2.us-west-1.amazonaws.com      |  opt-in-not-required  |  us-west-1      |
|  ec2.us-west-2.amazonaws.com      |  opt-in-not-required  |  us-west-2      |
+-----------------------------------+-----------------------+-----------------+
$ aws iam list-access-keys --query  "AccessKeyMetadata"
------------------------------------------------------------------------
|                            ListAccessKeys                            |
+-----------------------+------------------------+---------+-----------+
|      AccessKeyId      |      CreateDate        | Status  | UserName  |
+-----------------------+------------------------+---------+-----------+
|  AXXXXXXXXXXXXXXXXXWA |  2020-06-25T07:13:44Z  |  Active |  brokedba |
|  AXXXXXXXXXXXXXXXXZOA |  2020-09-02T00:24:17Z  |  Active |  brokedba |
+-----------------------+------------------------+---------+-----------+
$ aws s3 ls
2020-06-07 01:51:08 brokebucket
2020-06-13 20:01:06 brokereportbucket
$ aws ec2 describe-instances --query 'Reservations[].Instances[].{VPCID:VpcId,Subnet:SubnetId,image:ImageId,Rootdev:RootDeviceName,AZ:Placement.AvailabilityZone,PrivIP:PrivateIpAddress}'
-----------------------------------------
|           DescribeInstances           |
+----------+----------------------------+
|  AZ      |  us-east-1a                |
|  PrivIP  |  192.168.10.45             |
|  Rootdev |  /dev/sda1                 |
|  Subnet  |  subnet-08b49f9682c5da2b6  |
|  VPCID   |  vpc-096b461ebe9d06ff3     |
|  image   |  ami-01861c2f0a2adfdb7     |
+----------+----------------------------+
Aliases
AWS has made a CLI alias repository available in their GitHub. Some of them can help get a grasp of common queries like describing security groups, open public ports, running instances etc. You can quickly install it by running the below commands:
$ git clone https://github.com/awslabs/awscli-aliases.git
$ mkdir -p ~/.aws/cli
$ cp awscli-aliases/alias ~/.aws/cli/alias
AWS CLI version 2 is available since last February and is the recommended version. The upgrade to v2 is unfortunately not direct as the existing v1 has to be uninstalled first but the configuration will still be in place after upgrading (No pip install possible in v2).
You can quickly upgrade by following the below steps:
C:\Users\kosse>  aws --version
aws-cli/2.0.45 Python/3.7.7 Windows/10 exe/AMD64
1-– uninstall v1
$ sudo rm -rf /usr/local/aws $ sudo rm /usr/local/bin/aws
2-- install v2
$ curl "https://awscli.amazonaws.com/awscli-exe-linux-x86_64.zip" -o "awscliv2.zip"
$ unzip awscliv2.zip
$ sudo ./aws/install -i /usr/local/aws-cli -b /usr/local/bin

3-- Run the version command to confirm v2 was installed correctly
$ aws --version
aws-cli/2.0.45 Python/3.7.3 Linux/4.4.0-18362-Microsoft exe/x86_64.ubuntu.16$ complete -C aws_completer aws
Explore AWS CLI wizard (v2)

In this tutorial, we learned how to install and configure AWS-CLI v1 which took 5 minutes then upgraded to v2 that took, well… few more ;). We also described the command syntax and tried a few describe requests using AWS-CLI.
The new features of the AWS-CLI version2 (interactivity, SSO, autocomplete, wizards…) seem to bring more value to the tool which makes it worth a try.
Just remember to use –filters as a condition and –query as a select to reduce the overhead/response time on your CLI requests. Finally, feel free to consult AWS CLI Command Reference for more details and examples on AWS-CLI requests.
Introduction OCI Quick Start repositories on GitHub are collections of Terraform scripts and configurations provided by Oracle. These repositories ... Read More

Introduction So far, I have used Oracle AutoUpgrade, many times in 3 different OS’. Yet the more you think you’ve seen it all and reached the ... Read More